Mastering the order of draw is essential for accurate lab results and a successful phlebotomy career. This guide explains why order matters, the standard tube sequence used in the US, hands‑on techniques, and how this knowledge ties into phlebotomy certification classes, exams, state regulations, and entry‑level job opportunities for students preparing to enter the field.
Why order of draw matters for patient care and lab accuracy
The clinical significance of the order of draw cannot be overstated. It is the primary defense against preanalytic errors that compromise patient safety. When a phlebotomist collects multiple tubes of blood, the needle acts as a bridge between different chemical environments. Each tube contains specific additives designed to either promote clotting or prevent it. If these additives move from one tube to another, the chemical integrity of the blood sample is destroyed. This phenomenon is known as additive carryover. It is a subtle process that occurs at a microscopic level, yet its impact on laboratory results is profound.
The Mechanics of Additive Carryover
Cross Contamination Risks
Every time a needle pierces the rubber stopper of a collection tube, it is exposed to the internal coating of that tube. Some tubes contain liquid anticoagulants while others have spray-dried additives on the walls. When the needle is withdrawn and inserted into the next tube, trace amounts of the previous additive are introduced. This is especially problematic when moving from a tube with a strong anticoagulant to one intended for coagulation or chemistry testing. The vacuum inside the tubes can also cause a small amount of backflow. This happens if the blood inside the tube touches the needle before the vacuum is exhausted. This backflow carries chemicals directly into the needle assembly, contaminating every subsequent tube in the sequence.
Clinical Impact on Coagulation and Electrolytes
Potassium and Calcium Shifts
One of the most dangerous errors involves the lavender top tube. This tube contains EDTA, which is a potent anticoagulant that works by binding calcium. EDTA is often prepared as a potassium salt. If a lavender tube is drawn before a gold or red serum tube, the carryover of EDTA will cause a false elevation in potassium. Studies suggest this contamination can spike potassium levels by 1.5 mmol/L or more. It will simultaneously cause a false decrease in calcium levels. In a clinical setting, a potassium level that appears dangerously high is called pseudohyperkalemia. A physician seeing these results might order emergency heart medications or dialysis. This puts the patient at risk for actual cardiac arrest because the treatment is based on a lab error rather than the patient’s true physiological state.
Inaccurate Coagulation Times
The light blue tube contains sodium citrate. This is used for PT and INR tests to monitor patients on blood thinners. If the order of draw is ignored and a serum tube with clot activators is drawn before the citrate tube, the results will be skewed. Clot activators are often made of silica or thrombin. Even a trace amount of these substances can trigger the clotting process in the blue tube. This leads to shortened clotting times in the lab report. Conversely, if EDTA or heparin carries over into the citrate tube, the clotting times will be artificially prolonged by up to 20 percent. For a patient requiring surgery, an inaccurate PT/INR result could lead to life-threatening bleeding or the unnecessary postponement of a procedure.
Scientific Rationale and Contact Time
The Role of Additive Interaction
The risk of contamination is highest during the initial seconds of the draw. This is when the pressure differential is greatest. The scientific rationale for the specific sequence is based on the chemical compatibility of the additives. For example, heparin is used in green tubes to inhibit thrombin. While it is an anticoagulant, it interferes less with most chemistry tests than EDTA does. This is why green tubes are placed after serum tubes but before lavender tubes. The contact time between the needle and the additive is a critical factor. Even with modern safety needles and evacuated tube systems, the physical act of switching tubes creates a window for contamination. This risk increases significantly in small volume samples or pediatric draws where the ratio of additive to blood is higher.
Real World Consequences for Lab Workflow
Preanalytic Error Rates
Statistics from the Clinical and Laboratory Standards Institute (CLSI) indicate that preanalytic errors account for 60 to 70 percent of all laboratory mistakes. Following the correct order of draw is the most effective way to reduce these rates. When a sample is flagged for inconsistent results, the lab must often reject it. Rejection rates for errors like short draws or contamination average around 1.2 percent in US labs. This triggers a redraw. For the patient, this means another painful needle stick and a delay in diagnosis. For the hospital, it means increased costs and a slower workflow. In emergency departments, these delays can be the difference between a rapid intervention and a negative outcome. Mastering this sequence is a core requirement for the NHA Certified Phlebotomy Technician (CPT) certification because it directly correlates with the accuracy of the final lab report.
Internalizing Standards for Professional Practice
Certification and Employment Readiness
Students must internalize the order of draw until it becomes second nature. In the fast-paced environment of a hospital or a busy clinic, there is no time to consult a chart for every patient. Employers look for phlebotomists who demonstrate a deep understanding of why the sequence matters. It is not just about memorizing colors. It is about understanding the chemistry of the additives and the potential for patient harm. Before seeking Requirements to Become a Certified Phlebotomist in the United States, candidates must prove they can maintain this sequence under pressure. This knowledge ensures that every sample sent to the lab is a true representation of the patient’s health. It protects the phlebotomist from liability and ensures the highest standard of care in the modern healthcare system.
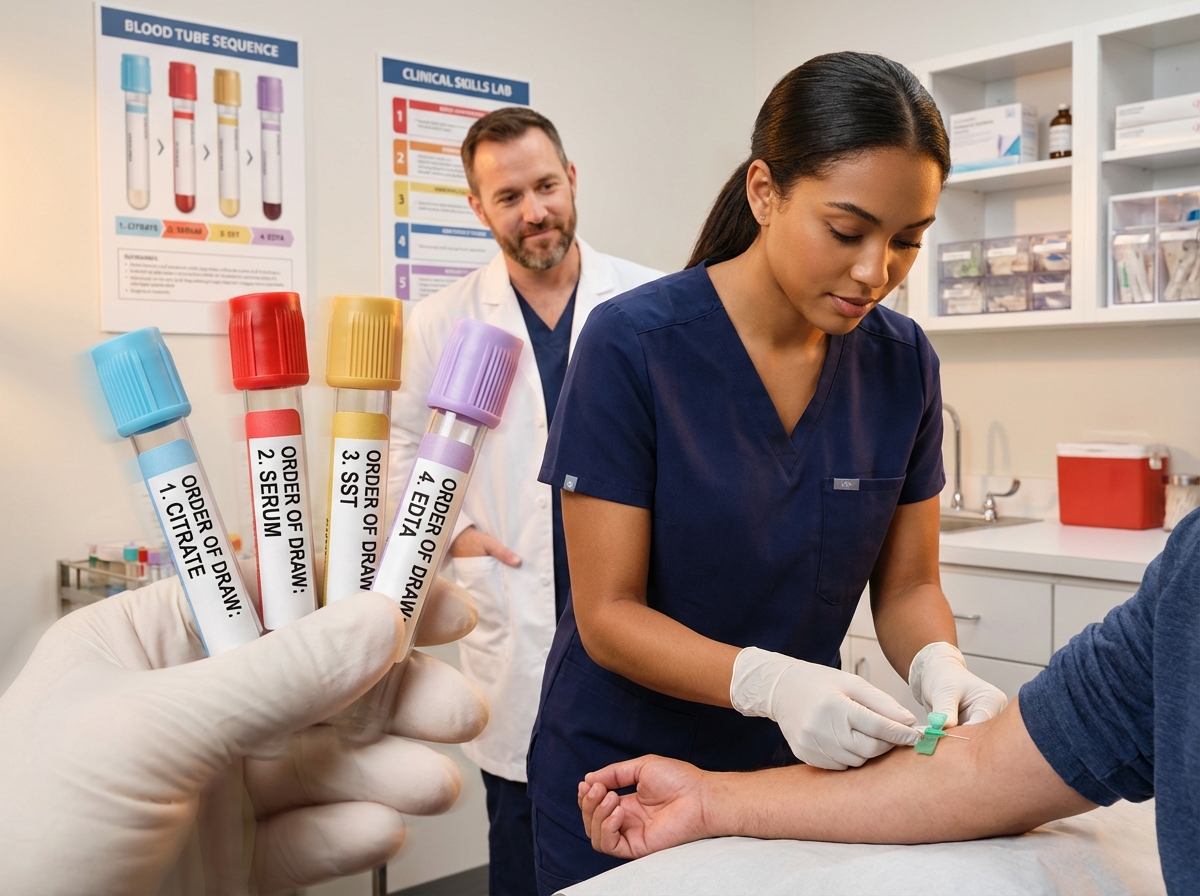
Standard order of draw used in the United States and why each tube comes next
The standard sequence for blood collection in the United States follows the CLSI H3-A6 guidelines to ensure lab results remain accurate. This sequence is known as the order of draw. It starts with sterile collections and moves through various anticoagulants and preservatives. Following this path prevents additives from one tube from leaking into the next one. Even a tiny drop of carryover can lead to a misdiagnosis or a dangerous medical error.
Blood Culture Sets
Yellow Top or Culture Bottles
Blood cultures always come first. These bottles contain a growth medium to detect bacteria or fungi in the blood. They are used for patients with suspected sepsis or unexplained fevers. You must draw these first to maintain a sterile environment. If you draw other tubes before cultures, the non-sterile needle or the rubber stoppers on the other tubes could introduce skin bacteria into the culture. This leads to a false positive result. In most cases, you will draw an aerobic bottle first followed by an anaerobic bottle. This ensures any air in the butterfly tubing does not enter the anaerobic environment.
Light Blue Tube
Sodium Citrate
The light blue tube contains 3.2 percent sodium citrate. This additive is an anticoagulant that binds calcium to prevent clotting. It is used for coagulation studies like Prothrombin Time (PT/INR) and Activated Partial Thromboplastin Time (aPTT). This tube must be filled to the etched line on the side to achieve a perfect nine-to-one ratio of blood to citrate. If the tube is underfilled, the excess citrate will bind too much calcium in the lab test. This results in a falsely prolonged PT or aPTT. If you draw this tube after an EDTA tube, the carryover of EDTA will also bind calcium and ruin the coagulation results.
Serum Tubes
Red, Gold, or Tiger Top
These tubes are used for chemistry, serology, and immunology tests. Red top tubes made of glass have no additives. Plastic red top tubes contain a silica clot activator to speed up the process. Gold or “tiger” mottled tops are Serum Separator Tubes (SST). They contain a gel that creates a barrier between the cells and the serum after centrifugation. These must come after the citrate tube to prevent the clot activator from interfering with coagulation tests. If you use a plastic serum tube before a light blue tube, the silica can trigger the clotting cascade in the blue tube. This leads to inaccurate, shortened clotting times. These tubes usually require five inversions to mix the activator with the blood.
Green Tube
Heparin
Green tubes contain lithium heparin or sodium heparin. Heparin works by inhibiting thrombin in the coagulation process. These are used for urgent chemistry tests like electrolytes, arterial blood gases, or ammonia levels. Lithium heparin is the most common version because it does not interfere with sodium or potassium measurements. You must draw green tubes after serum tubes. If heparin carries over into a serum tube, it can prevent the blood from clotting properly for the serum tests. This creates fibrin strands that clog lab equipment.
Lavender or Purple Tube
EDTA
The lavender tube contains EDTA, which is a strong anticoagulant that preserves the shape of blood cells. It is the primary tube for a Complete Blood Count (CBC) and hemoglobin A1c. EDTA is very high in potassium. If you draw this tube before a serum or green tube, the potassium carryover will cause a massive false elevation in the patient’s potassium levels. This is a common preanalytic error. A patient might appear to have life-threatening hyperkalemia when their actual levels are normal. EDTA also chelates calcium. This means it will cause a false drop in calcium levels if it contaminates a chemistry tube. For more on how these errors impact your career, you can review Requirements to Become a Certified Phlebotomist in the United States.
Gray Tube
Sodium Fluoride and Potassium Oxalate
The gray tube is the final step in the standard draw. It contains sodium fluoride, which acts as a glycolytic inhibitor. This prevents the red blood cells from eating the glucose in the sample. It also contains potassium oxalate as an anticoagulant. This tube is used for legal blood alcohol levels, glucose tolerance tests, and lactic acid. It is placed last because the additives are very disruptive to almost every other lab test. Potassium oxalate can damage cell membranes and sodium fluoride interferes with many enzyme-based chemistry assays.
Special Circumstances and Variations
Butterfly Needle Discard Tubes
When you use a winged infusion set or butterfly needle, the tubing contains about 0.5 milliliters of air (dead space). If you draw a light blue tube first, this air will take up space in the tube. The tube will not fill completely. This ruins the nine-to-one ratio. You must use a discard tube first. This can be another light blue tube or a non-additive red tube. You only need to draw enough blood to fill the tubing and clear the air (approximately 1 to 2 mL). Once the blood reaches the hub of the needle, you can discard that tube and start your actual light blue collection. Failure to do this can prolong clotting times by 15 percent due to the incorrect additive ratio.
Capillary and Neonatal Draws
The order of draw changes for skin punctures. When you perform a finger stick or a heel stick on a neonate, the blood begins to clot immediately. You must collect the EDTA microtainer first. This ensures the CBC sample does not have microclots. After the EDTA, you collect other additive tubes like heparin or gray top tubes. Serum tubes are collected last in capillary draws. This is the opposite of the venous order because the priority is preventing clots in the hematology sample. You can find more details on these specialized skills at Phlebotomy Technician – Blinn College.
Syringe Draws and Line Collections
If you use a syringe, you must transfer the blood into the tubes quickly. Use a transfer device and follow the same order of draw as the evacuated tube system. For line draws from an IV or central line, there is a high risk of dilution from IV fluids or heparin flushes. You must ask the nurse to clamp the line for at least 2 minutes before the draw. Then, you must discard the first 5 to 10 milliliters of blood. This clears any IV fluids that would dilute the sample. Failure to discard enough blood from a line can lead to falsely high glucose levels or inaccurate drug levels.
Practical visual steps to perform the order of draw correctly
Success at the bedside starts long before the needle enters the skin. When you are in a simulation lab or standing next to a patient bed, your preparation dictates the quality of the lab results. Start by verifying the identity of the patient using at least two unique identifiers. Ask for their full name and date of birth. Compare this information against the requisition form and the patient wristband. You must also confirm if the patient followed fasting instructions. Many tests for glucose or lipids require an eight to twelve hour fast. Ask about allergies to latex or adhesives. Check if the patient has a history of fainting during blood draws. This allows you to adjust their position for safety.
Organizing the Workspace
Tray Layout Strategy
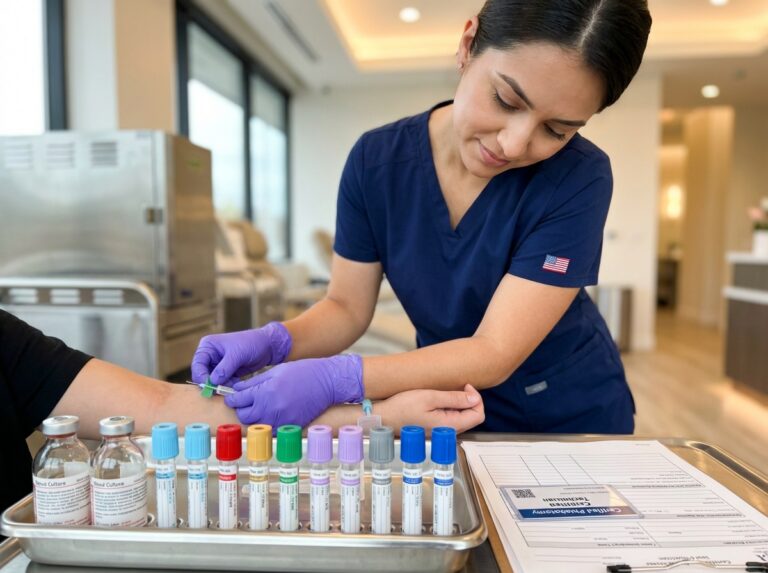
Arrange your supplies in the exact sequence you will use them. Place your tubes in a physical line from left to right. This visual path reduces the chance of grabbing the wrong color during the procedure. Your layout should begin with blood culture bottles if they are ordered. Follow this with light blue, then red or gold, then green, then lavender, and finally gray. Keep your alcohol pads, gauze, and bandages within easy reach of your non-dominant hand. This organization prevents you from reaching over the sterile field or the needle.
Needle and Equipment Selection
Choose a 21 gauge needle for most routine adult venipunctures. This size provides a good balance between flow rate and patient comfort. If the patient has small or fragile veins, a 23 gauge butterfly set is often better. Be aware that smaller needles like the 25 gauge increase the risk of hemolysis. Hemolysis happens when red blood cells rupture, which can falsely elevate potassium levels in the sample. Check all equipment for expiration dates and seal integrity before you begin.
The Venipuncture Process
Site Selection and Antisepsis
Apply the tourniquet three to four inches above the intended site. Look for the median cubital vein first. It is usually the best choice because it is well anchored. Cephalic and basilic veins are secondary options. Once you select a site, clean it with 70 percent isopropyl alcohol. Use a circular motion starting from the center and moving outward. Let the site air dry for at least fifteen seconds. Do not blow on the site or wave your hand over it to speed up drying. Wet alcohol causes a stinging sensation for the patient and can damage the blood cells in the tube.
Tourniquet Timing
Limit the tourniquet application to less than sixty seconds. If the tourniquet stays on too long, hemoconcentration occurs. This causes an artificial increase in proteins and cell counts. If you need more time to find a vein, release the tourniquet for two minutes before reapplying it. A good habit is to release the tourniquet as soon as blood flow is established in the first tube.
Managing the Draw
Evacuated Tube System Technique
Insert the first tube into the holder and push it onto the needle. Ensure the tube fills until the vacuum is exhausted. If you are using a butterfly set, you must use a discard tube first. This non-additive or red top tube clears the air from the butterfly tubing. Without this step, the first additive tube like the light blue citrate tube will underfill. Citrate tubes require a 90 to 100 percent fill to maintain the correct blood to additive ratio. An underfilled citrate tube will lead to inaccurate clotting times.
Mixing and Inversion Requirements
Mixing must happen immediately after each tube is removed from the holder. Do not wait until the end of the draw to mix the samples. Use a gentle figure eight motion to invert the tubes. Shaking the tubes will cause hemolysis. Proper mixing ensures the additives like EDTA or heparin are distributed evenly to prevent micro-clots.
| Tube Color | Additive Type | Recommended Inversions |
|---|---|---|
| Blood Culture | Broth Media | 8 to 10 times |
| Light Blue | 3.2% Sodium Citrate | 3 to 4 times |
| Red or Gold | Clot Activator or Gel | 5 times |
| Green | Lithium or Sodium Heparin | 8 to 10 times |
| Lavender | EDTA K2 or K3 | 8 to 10 times |
| Gray | Sodium Fluoride | 8 to 10 times |
Troubleshooting and Quality Control
Handling Errors and Contamination
If you realize you used the wrong tube out of sequence, do not just keep going. Stop the draw if possible. Label the contaminated tube clearly so the lab knows there is a risk of carryover. You should report the mistake to your supervisor immediately. Most facilities require you to perform a fresh draw on the patient to ensure accuracy. Following lab policy is better than sending a sample that provides a wrong medical result.
Hemolysis and Sample Rejection
If the lab flags a sample for hemolysis, it means the red cells broke. This often happens from using a needle that is too small, like a 25G, or leaving the tourniquet on for more than 60 seconds. If the result is for something critical like troponin or potassium, you must recollect the sample. Note the “H-flag” in the patient record and follow up with the clinician. Always check the site for a hematoma before trying a second draw. Short draws in lavender or green tubes might be processed depending on lab policy, but citrate tubes are always rejected if they are under ninety percent full. Mislabeled tubes are a critical error; never relabel a tube after it has left the patient side. You can find more details on professional standards through the NHA Certified Phlebotomy Technician (CPT) certification.
Practice Exercises
Students should practice tray setups until the sequence becomes second nature. Use photos of labeled sequences to quiz yourself. In the simulation lab, aim to complete a five tube draw in under three minutes while maintaining perfect inversion technique. Repeatedly practicing the transition between tubes helps you master the coordination needed to prevent needle movement while switching. Focus on the physical feel of the tube clicking into the holder and the timing of the tourniquet release.
How phlebotomy training certification and state rules relate to order of draw
Mastering the order of draw is not just a classroom exercise. It is a core requirement for professional survival in the 2025 medical landscape. Training programs across the United States now place heavy emphasis on this sequence because pre-analytical errors account for up to 70 percent of laboratory result inaccuracies. When you look for a quality course, you should prioritize those with an accredited curriculum and significant hands-on clinical hours. Most students choose between short certificate courses that last four to twelve weeks or more extensive community college programs. Hybrid models have become increasingly popular this year. These allow you to complete theory work online before attending in-person clinical externships.
Choosing a Quality Training Program
Accreditation and Clinical Hours
A reputable program must provide a balance of didactic learning and supervised practice. You should look for courses that offer at least 120 to 160 classroom hours. The AMT Phlebotomy Technician (RPT) requirements specify that a program should be accredited by a recognized entity like NAACLS. Beyond the books, the number of supervised draws is the most important metric. Quality programs typically require between 30 and 100 successful venipunctures on live subjects before you can graduate. Some institutions, like Blinn College, require students to pass a rigorous skills test before they are even approved for a clinical externship.
The Externship Component
An externship provides the bridge between a simulation lab and a fast-paced hospital environment. During this phase, you will apply the order of draw in real-time scenarios. Employers in 2025 look for candidates who have already navigated the complexities of difficult draws and multiple-tube orders. Many programs now include job placement assistance as part of their tuition, which often ranges from 1,000 to 3,000 dollars depending on the depth of the training.
National Certification Organizations
Most employers in the United States require or strongly encourage national certification. There are four major organizations that students typically pursue. Each has slightly different eligibility paths and testing focuses.
| Organization | Credential | Clinical Requirements | Exam Focus |
|---|---|---|---|
| NHA | CPT | 30 venipunctures, 10 capillary sticks | Safety, compliance, and order of draw (10% of exam) |
| AMT | RPT | 50 venipunctures, 10 skin punctures | Technical skills and laboratory law |
| ASCP | PBT | Accredited program completion within 5 years | Specimen processing and advanced anatomy |
| NPA | CPT | 160 classroom hours, 200 practical hours | Extensive clinical practice and theory |
The NHA CPT certification remains a top choice for entry-level technicians. Their 2025 exam format consists of 120 questions. About 12 of those questions specifically target the order of draw and additive carryover. To maintain these credentials, you will usually need to complete 10 continuing education credits every two years. This ensures you stay updated on the latest CLSI standards, which were reaffirmed in 2022 to maintain the current sequence of evacuated tubes.
Practical Skills and Exam Expectations
The practical portion of a certification exam or a job interview often involves a simulated draw. You will be expected to demonstrate the correct sequence for a five-tube draw within a three-minute window. Evaluators look for precise movements. They check if you arrange your tubes from left to right on your tray before the needle enters the arm. They also watch your inversion technique. For example, failing to invert a lavender EDTA tube 8 to 10 times immediately after collection can lead to micro-clots. This error would result in a failing grade on the practical assessment. Most organizations require an 80 percent pass rate on the skills portion to grant certification.
Interview Tips
Hiring managers often ask you to demonstrate a draw on a mannequin. They are looking for your safety habits and your knowledge of the order of draw. Be ready to explain why you are choosing a specific tube. Mention that you verify two patient identifiers every time. If you can show that you understand how to prevent preanalytic errors, you will stand out. About 70 percent of managers will test your hands-on skills during the interview process.
The State Regulatory Landscape
It is a common misconception that all states require a license to practice phlebotomy. In reality, 42 out of 50 states do not have a formal licensure requirement. However, the minority of states that do regulate the field have very specific rules. You must verify these with your local health department before you spend money on a program. California is the most stringent. It requires 40 hours of basic and advanced theory plus 40 hours of clinical practice. Washington requires a registration process that includes a background check to ensure no history of felonies or substance abuse. Louisiana requires seven hours of specific training regarding AIDS and a notarized oath of allegiance. You can find a detailed breakdown of these nuances in the Phlebotomy Requirements by State guide.
Entry-Level Job Options
Once you have your certification, several paths open up. The median salary for phlebotomists in late 2025 has reached approximately 41,800 dollars. The job market is projected to grow by 7 percent through 2030. Understanding the order of draw is vital in every one of these roles, but the stakes vary by setting.
- Hospital Inpatient
These roles make up 40 percent of the market. You will work with the most critically ill patients where even a small potassium elevation from EDTA contamination can lead to a misdiagnosis of hyperkalemia. - Outpatient Labs
These facilities handle high volumes of routine screenings. Efficiency and perfect tube sequencing are necessary to prevent sample rejections. - Physician Offices
You may be the only phlebotomist on staff. You will be responsible for the entire pre-analytical process from collection to shipping. - Mobile and Home Phlebotomy
This sector is growing rapidly. You must be highly organized because you will not have a supervisor nearby to double-check your tray layout. - Blood Centers and Dialysis Units
These roles often involve larger needle gauges and specific collection protocols for donors or patients with compromised vascular access.
Choosing a program that aligns with both national standards and your specific state rules is the first step toward a stable career. Employers in 2025 prioritize candidates who can explain the “why” behind the order of draw. They want technicians who know that drawing a light blue citrate tube before a red top prevents clotting factor activation. This level of knowledge distinguishes a basic technician from a true clinical professional.
Final results and next steps for students entering phlebotomy
Mastering the order of draw is the most important technical skill for any student entering the phlebotomy field. It directly prevents preanalytic errors. These errors account for 60 to 70 percent of all laboratory result issues. When you follow the correct sequence, you stop additive carryover. For example, EDTA from a lavender tube can contaminate a serum tube if drawn out of order. This contamination can spike potassium levels by 0.5 to 1.5 mmol/L. Such a mistake might lead to a misdiagnosis of hyperkalemia. Citrate carryover from light blue tubes can prolong PT results by 10 to 20 percent. These are not just numbers. They represent patient safety and the accuracy of medical decisions.
Prioritized Checklist for Certification
Your path to a first job starts with a structured plan. Follow these steps in order to ensure you meet all industry standards.
- Select an accredited course. Look for programs with 120 to 160 didactic hours. Ensure they offer at least 100 clinical hours.
- Verify state rules. Check the Phlebotomy Requirements by State list. States like California and Louisiana have strict licensing mandates.
- Pursue a recognized certification. The NHA Certified Phlebotomy Technician (CPT) certification is highly valued. Other options include AMT or ASCP.
- Complete supervised draws. Most certifications require 30 venipunctures. They also require 10 capillary sticks.
- Practice order of draw in simulation labs. Aim for 50 timed repetitions. You should be able to pull a 5 tube sequence in under 3 minutes.
- Document experience on a resume. List your total successful draws. Include the specific equipment you used.
Short Term Goals for New Phlebotomists
Setting realistic milestones helps maintain focus during the transition from classroom to clinic. Aim to complete your national exam within 2 to 3 months of finishing your coursework. During your clinical externship, push yourself to perform 5 to 10 supervised draws per week. This builds muscle memory. It also builds the confidence needed for high pressure environments like emergency rooms. Once you have your credentials, start applying to entry level roles. Hospitals hold about 40 percent of phlebotomy positions. Outpatient labs and physician offices are also great starting points. Use digital certification portals to access practice exams. Many offer up to 3 attempts for the final test. This ensures you are fully prepared before the actual date.
Long Term Career Growth and Specialization
Phlebotomy is a gateway to many healthcare careers. Once you have a year of experience, consider specializations. Pediatric phlebotomy requires advanced techniques to handle small volumes. Mobile phlebotomy offers independence. You could also move into roles as a lead phlebotomist or a lab assistant. Some professionals use their experience to transition into blood bank technology. Continuing education is vital. Most certifications require 10 credits per year for renewal. Stay updated on CLSI standards. The 2023 updates emphasized the impact of fill volumes on coagulation tests. Keeping your skills sharp improves your employability. It also leads to higher salary potential. The median wage in 2025 is around $41,800. Growth in this field remains steady at 7 percent through 2030.
Impact on Patient Safety
Competence with sample collection is the first line of defense in patient care. When you correctly invert a light blue tube 3 to 4 times, you prevent microclots. When you fill it to 90 percent capacity, you ensure the citrate to blood ratio is perfect. These small actions prevent sample rejection. Rejection rates for short draws average around 1.2 percent in US labs. Reducing these errors saves time. It saves hospital resources. Most importantly, it prevents the patient from needing a second needle stick. Employers in 2025 look for this level of detail. 96 percent of healthcare facilities prefer certified staff because they know these standards are met. Your technical precision translates directly into career stability in the US healthcare market.
The order of draw is a universal language in the lab. Mastering it proves you are a professional who prioritizes accuracy over speed.
Final Steps for Job Seekers
Prepare for interviews by being ready to demonstrate your skills. Many hiring managers will ask you to perform a draw on a mannequin. They will watch your tube sequence. They will count your inversions. Be ready to explain why you use a discard tube with a butterfly needle. Explain how you handle a hemolyzed specimen. Documenting these technical details on your resume sets you apart. Mention your familiarity with 2025 CDC antisepsis guidelines. Mention your experience with different needle gauges. A 21G needle is standard. A 23G butterfly is common for difficult veins. Knowing the hemolysis risk for each shows expertise. This level of preparation leads to faster hiring. It leads to a successful start in your new career.
Sources
- Phlebotomy Requirements by State — For the national certification exams, an applicant's phlebotomy training must have occurred within the previous 5 years of work (1 year). The applicant must …
- News in Phlebotomy 2025 — In 2025, several exciting developments are shaping the future of phlebotomy training, certification, and practice.
- NHA Certified Phlebotomy Technician (CPT) certification. — #### Earning your CPT credentials will help you:
## Certified phlebotomy technicians make a difference every day
- Phlebotomy Technician (RPT), How to Certify – AMT — Must include a minimum of 120 didactic clock hours (or as required by state law) or be accredited by a recognized entity (e.g., NAACLS). AND shall have …
- Top industry certifications for phlebotomists | Phlebotomy Certifications — To be certified as a PBT, you must have your high school diploma and have completed an accredited phlebotomy training program within the past five years. Your …
- NPA | Certified Phlebotomist – National Phlebotomy Association — The training program must include at least 200 hours of practical experience either with mannequins or clinical practicum or a combination of both. The program …
- Requirements to Become a Certified Phlebotomist in the United States — These requirements typically include completing a phlebotomy training program, passing a certification exam, and obtaining clinical experience. … state and …
- Phlebotomy Technician – Blinn College — Students must pass the theory portion (PLAB 1023) with a grade of at least 70% and must pass a skills test before obtaining approval to participate in the …
- Certified Phlebotomy Technician (CPT) — Certification materials include complete comprehensive study materials, unlimited practice exams, and three attempts to take the certification exam. Watch the …
Legal Disclaimers & Brand Notices
The information provided in this article is for informational and educational purposes only and does not constitute medical advice, professional diagnosis, or treatment. Always seek the advice of a physician or other qualified health provider with any questions you may have regarding a medical condition or procedure. Never disregard professional medical advice or delay in seeking it because of something you have read in this article.
All product names, logos, and brands are the property of their respective owners. All company, product, and service names used in this text are for identification purposes only. Use of these names, trademarks, and brands does not imply endorsement.