This article blends hands-on techniques for rolling and deep veins with a practical roadmap to phlebotomy certification and first jobs in the United States. You’ll learn assessment strategies, stepwise venipuncture tips, training and exam options, state rule variations, and how to land entry-level roles — all aimed at boosting skill, safety, and employability.
Techniques and Tools for Rolling Veins and Deep Veins
After you’ve assessed the patient and identified a challenging draw, the next step is execution. Success with difficult sticks, especially those involving rolling or deep veins, depends less on luck and more on a systematic approach that combines preparation, technique, and the right tools. Mastering these strategies will help you approach any draw with confidence and precision, ensuring both patient safety and sample integrity.
Preparation is Everything
Before you even pick up a needle, setting the stage correctly can dramatically increase your chances of success.
- Patient Positioning and Lighting. Position the patient comfortably, ideally in a reclining chair, with their arm extended and supported on a flat surface below the level of their heart. This uses gravity to help blood pool in the extremity, making veins fuller. Ensure you have excellent lighting; a small, adjustable lamp can be invaluable for creating shadows that highlight subtle venous pathways.
- Temperature Control. A cold room or a nervous patient can lead to vasoconstriction, where veins shrink and retreat. If possible, ensure the room is comfortably warm. Offering the patient a blanket can help them relax, which encourages veins to dilate.
Practical Warm-Up and Tourniquet Strategies
A little warmth can go a long way in making a difficult vein more cooperative.
Warm Compresses and Hydration. Applying a warm compress or a commercial warming pack to the potential venipuncture site for 3 to 5 minutes is one of the most effective deep vein venipuncture tips. The heat encourages vasodilation, bringing deep or small veins closer to the surface and making them easier to palpate. If the draw is not for a fasting test and time permits, encourage the patient to drink a glass of water 15 to 20 minutes beforehand. Good hydration plumps up veins, making them bouncier and easier to access.
Tourniquet Best Practices. Proper tourniquet application is critical. Place the tourniquet 3 to 4 inches above your intended puncture site, ensuring it’s flat against the skin. It should be snug enough to impede venous flow but not so tight that it cuts off arterial circulation, which you can check by feeling for a radial pulse. Never leave a tourniquet on for more than one minute. If you need more time to find a vein, release it for two minutes before reapplying. For patients with fragile or geriatric skin, consider using a blood pressure cuff inflated to just below the patient’s diastolic pressure as a gentler alternative.
Mastering the Anchor to Stop Vein Rolling
The single most important technique for how to stop vein rolling is a solid anchor. A rolling vein is simply an unsecured vein, and your job is to immobilize it. Practice your anchoring technique on every single draw, as it is one of the most critical foundational skills.
Using your non-dominant hand, place your thumb about one to two inches below the intended puncture site and your fingers on the back of the patient’s arm. With firm pressure, pull the skin downwards, stretching it taut over the vein. This maneuver does two things: it pulls the skin tight so the needle can enter smoothly, and it pins the vein between your thumb and the underlying fascia, preventing it from moving side to side. This counter-traction is non-negotiable for any vein that feels like it might roll.
Needle Selection, Angle, and Insertion
The right tool for the job makes all the difference.
- Butterfly vs. Straight Needle. A butterfly needle (winged infusion set) is often preferred for small, fragile, or superficial veins, like those on the hand or in pediatric and elderly patients. The wings provide greater control, and the angle of entry can be shallower. A straight needle is the standard for larger, well-anchored veins like the median cubital. For deep veins, a longer straight needle may be necessary to reach your target.
- Gauge and Bevel. The gauge depends on the tests ordered and the vein’s quality. A 21- or 22-gauge is standard. A 23-gauge butterfly might be used for very small veins, but be aware that smaller gauges increase the risk of hemolysis. Always ensure the bevel of the needle is facing up upon insertion.
- Angle and Depth. For a standard superficial vein, the insertion angle is typically 15 to 30 degrees. For a confirmed deep vein, you may need a slightly steeper angle, closer to 30 degrees, to ensure you reach the target without going through it. The motion should be smooth, quick, and confident. Once you see a flash of blood, decrease the angle slightly and advance the needle a tiny bit further to secure it within the vein.
- Syringe vs. Vacuum Tube. A vacuum tube (vacutainer) creates a standardized, strong suction that can be too aggressive for a fragile vein, causing it to collapse. A syringe, on the other hand, allows you to control the pressure. By pulling back slowly on the plunger, you can gently aspirate the blood at a rate the vein can handle, which is a key piece of phlebotomy troubleshooting.
Troubleshooting and Special Populations
Even with perfect preparation, you may encounter issues.
If you insert the needle and don’t get a flash of blood, do not probe or “fish” for the vein; this is painful and can cause significant tissue and nerve damage. You may need to advance it slightly further or withdraw it a tiny bit. If you suspect the vein has rolled, you can withdraw the needle just below the skin’s surface, re-anchor firmly, and redirect the needle. If blood flow stops, the bevel may be pressed against the vein wall; a slight rotation of the needle can fix this. If a vein collapses, you can sometimes salvage the draw by releasing the tourniquet slightly or slowing your syringe draw.
The industry standard is to stop after two unsuccessful attempts. Continuing is unsafe and causes unnecessary patient anxiety. Never be afraid to ask for help. Politely inform the patient you’re going to get a colleague with a fresh perspective, which demonstrates professionalism and a commitment to their well-being.
For special populations, adapt your technique. With obese patients, trust your palpation skills over sight. For chemotherapy patients, avoid arms with ports or fistulas and be aware that their veins may be scarred. Always ask about mastectomies and avoid drawing from the arm on the affected side to prevent lymphedema.
Adjunctive Technology and Complication Prevention
In very difficult cases, technology can help. Near-infrared (NIR) vein finders project a map of the veins on the skin, which can be invaluable. While helpful for visualization, they are not a substitute for palpation skills, as they cannot tell you about a vein’s depth or stability. Ultrasound-guided venipuncture is another option, but this is typically performed by specially trained nurses or vascular access teams. As an entry-level phlebotomist, your role is to recognize when a draw is beyond your scope and to escalate appropriately.
To prevent complications, always release the tourniquet before withdrawing the needle, and apply immediate, firm pressure to the site to prevent a hematoma. Be aware of the anatomy of the antecubital fossa to avoid the brachial artery and median nerve.
Finally, communication is key. An anxious patient is a difficult draw. Throughout the process, communicate calmly with simple phrases.
"I'm just going to feel for the best vein. Take a nice, slow deep breath for me."
"This one might be a little tricky, so we're going to take our time. You're doing great."
By combining these techniques, you can turn a potentially stressful situation into a successful one.
Training Pathways, Certification Exams, State Rules, and First Job Strategies
After mastering the hands-on techniques for difficult draws, the next step is translating that skill into a professional career. This involves navigating the world of training programs, certification exams, and state regulations to land your first phlebotomy job. The path isn’t always the same for everyone, but understanding the landscape is the key to a successful start.
Your journey begins with formal training. When you start looking for “phlebotomy classes near me,” you’ll find several options.
- Community colleges often offer phlebotomy as part of a broader medical assisting program or as a standalone certificate.
- Vocational and technical schools provide focused, career-oriented training designed to get you into the workforce quickly.
- Hospital-based programs give you immediate exposure to a clinical environment, which can be a huge advantage.
- Online hybrid courses offer flexibility with theoretical coursework online, but always require in-person lab work and clinical practice. You simply cannot learn to draw blood through a screen.
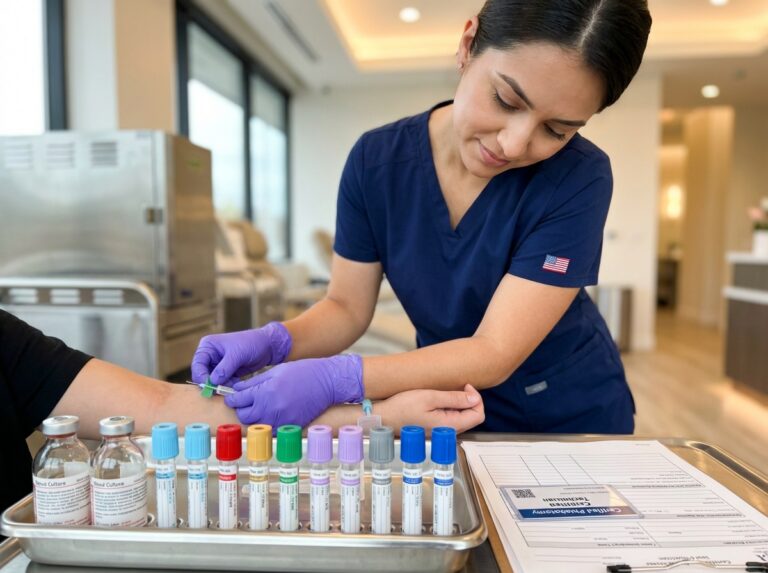
Regardless of the format, a quality program will include classroom instruction covering anatomy, physiology, safety protocols, and medical ethics, followed by a hands-on lab practicum. The most critical component is the clinical externship, where you’ll perform blood draws on real patients under supervision. Programs typically require a minimum number of successful draws, often ranging from 50 to 100 venipunctures and 10 to 25 skin punctures, to be eligible for graduation and certification.
Once you complete your training, the next milestone is earning a national phlebotomy certification. While there is no federal requirement, most employers demand it. Certification demonstrates your competence and commitment to the profession. The main certifying bodies in the U.S. include:
- American Society for Clinical Pathology (ASCP) Board of Certification. Highly respected, especially in hospital settings.
- American Medical Technologists (AMT). Offers the Registered Phlebotomy Technician (RPT) credential.
- National Healthcareer Association (NHA). Provides the Certified Phlebotomy Technician (CPT) credential, which is widely recognized.
- National Phlebotomy Association (NPA). Another long-standing organization offering CPT certification.
Exams typically consist of 100-150 multiple-choice questions covering topics like patient identification, order of draw, specimen handling, and safety procedures. To maintain your credential, you’ll need to complete continuing education credits and renew your certification every one to three years, depending on the agency.
It’s also important to know that rules vary by state. Most states don’t have their own licensing requirements, deferring to national certification. However, currently four states do mandate state-level licensure or certification: California, Louisiana, Nevada, and Washington. California, for example, has a tiered system (CPT I and CPT II) with specific training and experience requirements. Always check with your state’s department of health for the most current regulations; a general overview can often be found on resources like the Phlebotomy licensure in the United States Wikipedia page.
Choosing the right training program is crucial. Look for accreditation from a recognized agency, as this ensures the program meets quality standards. Ask about the number of clinical hours provided and whether they offer assistance with externship placement. The entire process, from starting a certificate program to getting certified, can take anywhere from 4 to 16 weeks.
With your certification in hand, it’s time to find your first phlebotomy job. Entry-level jobs are available in hospitals, outpatient labs, blood donor centers, and physicians’ offices. According to the U.S. Bureau of Labor Statistics, the median pay for phlebotomists was $41,810 per year as of May 2023, though this varies by location and employer. For the most current salary data, consult the Bureau of Labor Statistics Occupational Outlook Handbook.
Your resume should prominently feature your certification, the number of successful draws you completed, and any specialized experience. Highlight soft skills like patient communication, empathy, and attention to detail. During interviews, be prepared to discuss how you handle challenging situations. Employers will verify your certification and conduct a thorough background check. You’ll also need to provide proof of immunizations, typically including the Hepatitis B series and a recent TB test. It is wise to start gathering your immunization records as soon as you decide to pursue phlebotomy, as completing a vaccine series can take time and prevent delays in your enrollment or hiring process. Finally, expect to complete workplace safety training, such as OSHA’s Bloodborne Pathogens standard, as a condition of employment.
Conclusions and Next Steps for Skill Building and Career Growth
You’ve learned the theory, understood the anatomy, and now you’re ready to bridge the gap between knowledge and confident practice. Mastering difficult venipunctures is not about luck; it’s a combination of technique, assessment, and persistence. The core takeaways from this guide are simple but powerful. For rolling veins, the key is a firm anchor using your non-dominant thumb to stretch the skin taut below the puncture site. For deep veins, it’s about trusting your fingers over your eyes, palpating for that spongy bounce, and adjusting your needle angle slightly steeper to reach your target. Just as important is knowing your limits. A thorough assessment before you even pick up a needle is your best tool. If you cannot confidently locate a vein after a careful search, safe escalation to a more experienced colleague is not failure. It is a mark of professionalism and a commitment to patient safety. This foundation, combined with formal certification, is what transforms a student into a sought-after professional and opens doors to rewarding entry-level phlebotomy jobs.
Your journey forward starts now. To turn these concepts into career momentum, here is an actionable 30-day plan designed to build your skills and confidence.
Your First 30 Days: A Plan for Success
- Week 1: Foundational Practice and Study Plan
- Practice Goal: Focus on mastering the basics on practice arms. Aim for 20-25 simulated venipunctures, concentrating on smooth needle insertion, anchoring technique, and proper tube handling. Get comfortable with your equipment before moving to real patients.
- Certification Study: Create a study schedule. Your first week should cover the fundamentals. Master these topics.
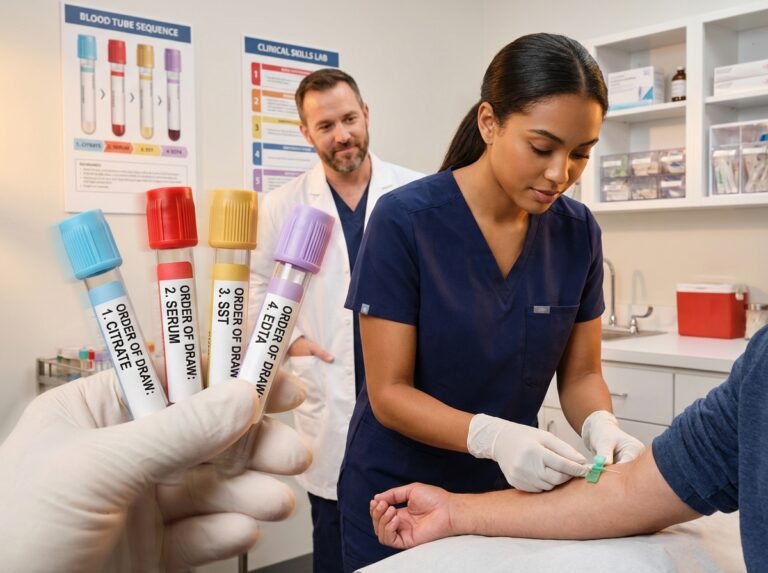
- The Order of Draw and Tube Additives
- Anatomy of the Antecubital Fossa
- Infection Control and OSHA Safety Standards
- Job Search Action: Start drafting your resume. Even without certification yet, you can create a strong template. Include your training program’s name and expected completion date. Add a section for “Clinical Skills” where you will later list venipuncture, capillary puncture, and safety protocols.
- Week 2-3: Supervised Clinical Experience
- Practice Goal: This is where your skills truly develop. During your clinical externship, aim to complete between 50 and 75 successful supervised venipunctures. This range is typical for many programs and is a solid benchmark for entry-level competency. Ask your preceptor to observe you on at least one or two challenging draws, like a hand vein or a patient with deeper tissue.
- Certification Study: Deepen your knowledge base. Focus on special populations and complications.
- Pediatric and Geriatric Phlebotomy Techniques
- Handling Complications (Hematoma, Fainting, Nerve Damage)
- Special Specimen Handling (Chilled, Light-Sensitive)
- Job Search Action: Refine your resume. Add the number of successful sticks you’ve completed. Start searching online job boards for entry-level phlebotomy jobs in your area to see what employers are looking for. Notice the keywords they use in their job descriptions.
- Week 4: Final Prep and Application Push
- Practice Goal: Continue to seek opportunities for varied draws. If you’ve mostly drawn from the median cubital vein, ask for chances to practice on the cephalic vein. Your goal is to feel comfortable assessing and selecting the best available site, not just the easiest one.
- Certification Study: Take practice exams. Most certifying bodies offer them. This helps you get used to the question format and timing. Review any areas where you consistently score low. Master the legal and ethical aspects of patient care.
- Patient Identification (The Two-Identifier Rule)
- Patient Rights and HIPAA
- Quality Assurance and Documentation
- Job Search Action: Finalize and polish your resume. Have a career services advisor or a trusted mentor review it. Begin applying for positions. Target hospitals, outpatient diagnostic labs, and blood donation centers. Customize your cover letter for each application, highlighting your training and enthusiasm.
As you move through this plan and into your career, remember that growth is a continuous process. Patient safety must always be your guiding principle. Every draw, whether perfect or challenging, is a learning experience. Keep a small notebook to track your successes and, more importantly, your complications. Did a vein roll? Note how you anchored it and what you might do differently next time. Did you have trouble finding a deep vein? Note the patient’s anatomy and the palpation technique that eventually worked. This personal log will be one of your greatest teachers.
Seek out mentorship from seasoned phlebotomists. Ask them how they handle difficult situations. Their practical wisdom is invaluable. Don’t be afraid to say, “I’m having trouble with this one, can you take a look?” This humility and willingness to learn will earn you respect. As you gain experience, think about your next steps. Continuing education can help you advance into roles like a lead phlebotomist, a phlebotomy instructor, or even a laboratory technician. The skills you build now are the foundation for a long and stable healthcare career.
Your path to become a certified phlebotomist is clear. The final step is to take action. Verify your specific state’s rules by checking with its department of health or reviewing a reliable resource like the phlebotomy licensure guide. Enroll in a reputable, accredited program that offers a strong clinical externship. Once enrolled, commit to practicing the stepwise techniques for assessment, anchoring, and insertion. With each successful draw, you will not only improve venipuncture skills but also build the unshakable confidence that defines a true healthcare professional.
References
- Phlebotomy Certification Process: Steps to Become Certified in 2025 — In 2025, the demand for skilled, certified phlebotomists continues to rise in hospitals, clinics, labs, and mobile services. And the best part?
- Phlebotomist – ASCP — You may need to show proof of immunization, a minimum GPA upon high school graduation or a GED degree, and CPR certification. You may also need to complete a …
- Phlebotomy licensure in the United States – Wikipedia — There are no federal phlebotomy training or certification requirements, though several states have imposed their own requirements. In 2024, four states require …
- Phlebotomy Certification Guide | Goodwin University — Learn about becoming a certified phlebotomist, including requirements for phlebotomy certification and the types available.
- Phlebotomy Program – St. Louis School of Phlebotomy — This course contains 6-weeks of lecture, discussion, and practical instruction in the lab, followed by a 40-hour clinical externship at a local patient service …
- Phlebotomy Training Program – GTCC — You will also be required to have: 12-panel drug test (do not complete until 30 days before clinical); Criminal Background Check. You may use any company that …
- Phlebotomy Certification Programs and Training Class | NMC — Criteria · High school graduate · Ability to read, write and speak English · Demonstration of success in science and math courses, from either high school or …
- Phlebotomists : Occupational Outlook Handbook — Requirements vary by organization but may include education and clinical experience, passing an exam, and practical components, such as drawing blood.
- 2025 Phlebotomy Certification: What You Need To Know — Educational Prerequisites: High school graduate or GED with science coursework. · Enroll in an Accredited Phlebotomy Program: Select a training …
Legal Disclaimers & Brand Notices
Medical Disclaimer: The information provided in this article is for informational and educational purposes only. It is intended to serve as a guide for individuals pursuing phlebotomy training and certification. This content is not a substitute for professional medical advice, diagnosis, or treatment provided by a licensed healthcare professional. Always seek the advice of a qualified physician or other healthcare provider with any questions you may have regarding a medical condition or procedure. Never disregard professional medical advice or delay in seeking it because of something you have read in this article. Reliance on any information provided by this article is solely at your own risk.
Trademark and Brand Notice: All organizational names, certifications (e.g., ASCP, AMT, NHA, NPA), logos, and brands mentioned are the property of their respective owners. The use of these trademarks is for identification and informational purposes only and does not imply endorsement or affiliation unless explicitly stated.