Accurate blood collection relies fundamentally on the correct order of draw. This article details the 2025 standard order of draw, provides a practical mnemonic, outlines tube additives and test pairings, identifies common collection pitfalls, and explains how mastering this protocol supports phlebotomy certification and early-career job readiness across the United States.
Why Order of Draw Matters
The sequence of blood collection is a strict clinical requirement designed to protect the accuracy of laboratory results. Known as the order of draw, this sequence exists primarily to prevent additive carryover. When a phlebotomist inserts a needle into the rubber stopper of a collection tube, the needle tip contacts the chemical additives inside. As the needle is withdrawn and inserted into the subsequent tube, microscopic amounts of those chemicals can transfer. This cross-contamination can lead to significant errors in blood chemistry and coagulation studies.
The Clinical and Laboratory Standards Institute (CLSI) provides the gold standard for these procedures. Their 2025 updates continue to emphasize that the order of draw is a critical step in the pre-analytical phase of testing—the phase where the majority of laboratory errors occur. Adhering to the correct order ensures specimen integrity and guarantees that results reflect the true physiological state of the patient.
One of the most dangerous examples of carryover involves the lavender top tube. This tube contains Ethylenediaminetetraacetic acid (EDTA), a chemical that chelates (binds) calcium in the blood to prevent clotting and is often formulated as a potassium salt. If a phlebotomist draws a lavender tube before a gold (serum) or green (heparin) tube, the EDTA can carry over into the next specimen. This results in a false decrease in calcium levels because the EDTA binds the calcium in the second tube. Simultaneously, the potassium from the EDTA can cause a false increase in the potassium reading. This is a major safety issue; a physician might see a high potassium result and order medication to lower it, potentially causing heart rhythm problems in a patient with normal potassium levels.
Coagulation testing is equally sensitive to order of draw. The light blue tube contains sodium citrate, used for tests like Prothrombin Time (PT). If a serum tube with a clot activator is drawn before the light blue tube, the activator can enter the citrate tube and trigger premature clotting. The lab results will then show a shorter clotting time than what is occurring in the patient’s body, potentially leading a physician to incorrectly adjust blood thinner medication. According to CLSI guidelines, the light blue tube must always be drawn before tubes containing other additives like heparin or EDTA to maintain the correct blood-to-additive ratio and prevent interference.
Heparin carryover is also a concern. Found in green top tubes, heparin acts as an anticoagulant by inhibiting thrombin. If heparin enters a tube intended for coagulation studies, it will artificially prolong clotting times and can interfere with certain enzyme tests and molecular diagnostics. Similarly, the gray top tube contains sodium fluoride (a glycolytic inhibitor) and potassium oxalate. If these chemicals carry over, they can damage cell membranes or interfere with enzyme levels like urease.
The impact of these errors extends beyond laboratory data. Specimen integrity is the foundation of diagnostic medicine. When the order of draw is ignored, diagnostic errors, unnecessary follow-up tests, and reporting delays occur. When the lab identifies an impossible result—such as a potassium level incompatible with life in a walking patient—they must reject the sample, requiring a redraw.
Redraws cause physical discomfort to the patient and delay critical treatments. In a fast-paced hospital environment, a one-hour delay while waiting for a second blood draw can be detrimental. The Center for Phlebotomy Education notes that additive carryover is often invisible to the naked eye, making strict adherence to the tube sequence essential for every draw.
Current best practices from the College of American Pathologists (CAP) and the FDA highlight the importance of standardized training. Employers seek candidates who recognize that phlebotomy is a precision science. Understanding that EDTA chelates calcium or that clot activators interfere with citrate tubes demonstrates a high level of professional competence. By preventing the migration of anticoagulants and activators between tubes, phlebotomists ensure the healthcare system functions efficiently and patients remain safe from incorrect treatments.
Standard Order of Draw with Tube Details and Test Associations
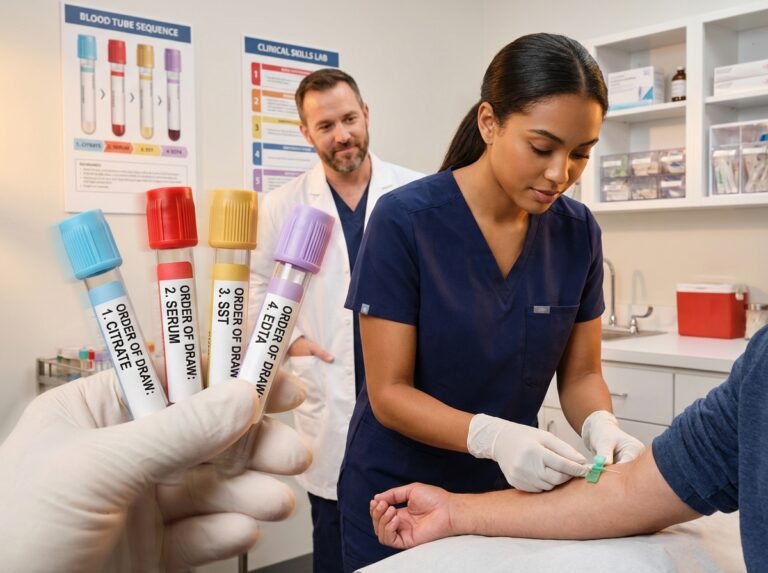
The standard sequence for blood collection in United States clinical laboratories follows the guidelines established by the CLSI GP41 document. This sequence is designed to prevent the migration of additives from one tube to the next, ensuring that the chemical properties of one tube do not interfere with the testing requirements of subsequent tubes. The accepted order begins with blood cultures, followed by the light blue coagulation tube, then serum tubes (red/gold), heparin tubes (green), EDTA tubes (lavender/pink), and finally the gray glycolytic inhibitor tube.
1. Blood Culture Collection
Sterile blood culture bottles always come first to maintain a sterile environment. These bottles contain a growth medium and Sodium Polyanethol Sulfonate (SPS). SPS prevents clotting and neutralizes certain antibiotics. You must clean the site with a rigorous antiseptic protocol before collection. If using a butterfly needle, draw the aerobic bottle first so that air in the tubing does not enter the anaerobic bottle. Most adult sets require 8 to 10 milliliters of blood per bottle; underfilling can lead to false-negative results due to insufficient blood volume to detect low levels of bacteria.
2. Light Blue Top (Sodium Citrate)
The light blue tube is the first additive tube in the sequence after cultures. It contains 3.2 percent sodium citrate, which binds calcium to prevent coagulation while preserving clotting factors. It is used for coagulation studies like Prothrombin Time (PT) or Activated Partial Thromboplastin Time (aPTT). A critical requirement is the 9:1 ratio of blood to anticoagulant. You must fill the tube until the vacuum is exhausted to reach the etched fill line. Underfilling results in an excess of citrate, falsely prolonging clotting times. Perform 3 to 4 gentle inversions immediately after collection. If using a butterfly set and this is the first tube drawn, you must use a discard tube to prime the tubing and remove dead space air.
3. Serum Tubes (Red, Gold, Tiger Top)
Serum tubes are collected after the citrate tube. Plastic red top tubes contain a clot activator to encourage clotting within 30 minutes. Gold tops or tiger tops are Serum Separator Tubes (SST), containing a clot activator and thixotropic gel to separate serum from cells during centrifugation. These are used for chemistry profiles, lipid panels, and immunology tests. Glass red tubes typically contain no additives. According to CLSI guidelines, collecting these after the blue tube prevents potential carryover of clot activators into coagulation samples, while collecting them before heparin/EDTA prevents anticoagulant contamination in serum chemistry tests. Invert plastic and SST tubes 5 to 8 times.
4. Green Top and PST (Heparin)
Green tubes contain heparin (lithium or sodium), which inhibits thrombin. Light green tubes often contain a separator gel and are called Plasma Separator Tubes (PST). These are frequently used for STAT chemistry tests, such as electrolyte panels and troponin, because they can be centrifuged immediately. Invert these tubes 8 to 10 times. Note that sodium heparin can falsely elevate sodium results in electrolyte panels, so lithium heparin is often preferred for routine chemistry.
5. Lavender and Pink Tops (EDTA)
Lavender tubes contain EDTA, which chelates calcium to prevent clotting. This is the standard for hematology tests like the Complete Blood Count (CBC). Pink tubes also contain EDTA but are labeled specifically for blood bank crossmatching. EDTA preserves blood cell morphology for microscopic examination but is high in potassium. Drawing this tube before a chemistry tube can cause false high potassium and false low calcium readings. Invert 8 to 10 times. Underfilling can cause red blood cell shrinkage due to excess additive concentration.
6. Gray Top (Glycolytic Inhibitors)
The gray tube is usually the last in the routine sequence. It contains sodium fluoride (a glycolytic inhibitor) and potassium oxalate (an anticoagulant). Sodium fluoride prevents red blood cells from consuming glucose, making this tube primary for glucose testing and blood alcohol levels. Because potassium oxalate precipitates calcium, carryover can damage other tests. Invert 8 to 10 times. Sodium fluoride can interfere with some enzyme determinations, necessitating its placement at the end of the draw.
Specialty Tubes and Trace Elements
Royal blue tubes are used for trace element testing (lead, zinc, mercury). Placement depends on the additive: if the tube contains EDTA, collect it with other EDTA tubes; if it contains no additive or a clot activator, collect it with serum tubes. Yellow tubes may contain Acid Citrate Dextrose (ACD) for DNA testing or SPS for microbiology; check the label to determine placement. For pediatric microcollection, the order is reversed: collect EDTA tubes first to prevent micro-clots, followed by other additive tubes, and serum tubes last.
| Order | Tube Color | Primary Additive | Common Lab Tests |
|---|---|---|---|
| 1 | Blood Cultures | SPS / Broth | Sepsis, Bacterial Growth |
| 2 | Light Blue | Sodium Citrate | PT, PTT, D-Dimer |
| 3 | Red / Gold | Clot Activator / Gel | CMP, Lipid, Hormones |
| 4 | Green / PST | Lithium Heparin | Electrolytes, Troponin |
| 5 | Lavender / Pink | EDTA | CBC, HgbA1c, Crossmatch |
| 6 | Gray | Sodium Fluoride | Glucose, Lactic Acid |
Practical Modifications
When drawing from a vascular access device or IV line, the order remains the same, but a discard volume (usually 5 to 10 mL) is required to clear heparin or saline flush. For point-of-care testing, refer to device-specific requirements. Always consult NCCT Order of Draw resources for specialty tube placement. Strict adherence ensures patient safety and laboratory accuracy.
Techniques, Troubleshooting, and Special Collection Scenarios
The physical process of drawing blood involves technical choices that directly impact sample chemistry. Using an evacuated tube system is preferred because the vacuum is calibrated to draw the exact volume needed for the additive ratio. Holding tubes in a downward position minimizes additive carryover by preventing blood in the tube from touching the needle inside the holder.
Syringe and Butterfly Considerations
Syringe draws require manual transfer of blood into vacuum tubes using a safety transfer device following the standard order of draw. Never use the syringe needle to pierce tube stoppers manually. Butterfly sets introduce air from the tubing, which can displace blood in the first tube. If the first tube is a light blue sodium citrate tube, this air will cause underfilling, ruining the 9:1 ratio. You must use a discard tube (plain red or another light blue) to clear the air. You only need to see blood enter the discard tube before switching to the sample tube.
Site Preparation and Hemolysis
Proper skin preparation is non-negotiable. Allow 70 percent isopropyl alcohol to air dry completely; wet alcohol can cause hemolysis (rupturing of red blood cells) and stinging. Hemolysis leads to sample rejection and inaccurate results for potassium, magnesium, and enzymes. Additionally, choose the correct needle gauge; a 21-gauge needle is standard, while smaller needles (e.g., 25-gauge) can shear cells under high pressure.
Tourniquet Timing and Contamination
Do not leave the tourniquet on for longer than 60 seconds. Prolonged application causes hemoconcentration, where plasma leaves the vessel while cells and proteins remain, artificially raising analyte concentration. If vein location takes longer, release the tourniquet and wait two minutes before reapplying to allow blood flow to return to baseline. See the NCCT Phlebotomy Order of Draw guide for details on preanalytical variables.
Capillary Collection Sequence
Capillary draws (fingersticks/heelsticks) follow a reversed logic. You must collect EDTA tubes first because platelets begin to clump immediately at the skin puncture site. Collecting lavender/pink microtainers first ensures accurate cell counts. Follow with other additive tubes (heparin) and finally serum tubes. This sequence is a frequent certification exam topic. The CLSI guidelines provide the clinical reasoning for this distinction.
Line Draws and IV Contamination
Draw from a site below an IV if possible. If using the line itself, turn off the infusion for at least two minutes and withdraw a 5–10 mL discard volume to clear residual medication. For blood cultures from central lines versus peripheral sites, label clearly to distinguish potential line contamination from systemic infection. Always use appropriate antiseptics (e.g., chlorhexidine) per manufacturer instructions.
Correcting Common Errors
Errors often occur during mixing. Invert tubes gently 5 to 10 times (3 to 4 for light blue). Vigorous shaking causes hemolysis; insufficient inversion leads to micro-clots that clog instruments. Never pour blood from one tube to another to fix an order error; this violates safety protocols and invalidates results. A new venipuncture is required. Also, check for expired tubes, as their vacuum may fail, leading to insufficient samples.
Certification and Competency
Mastering these techniques is central to clinical competency. Certification exams assess your ability to maintain the order of draw while managing patient safety. Examiners check for immediate tube inversion and proper sequence. Demonstrating these best practices proves readiness for professional phlebotomy in high-volume environments.
How Mastering Order of Draw Helps Certification and Landing First Phlebotomy Jobs
The journey toward a phlebotomy career in the United States typically begins with certification. While not always legally required by every state, most employers mandate a national credential. The American Society for Clinical Pathology (ASCP) PBT certification is an industry gold standard, alongside the National Healthcareer Association (NHA) CPT, American Medical Technologists (AMT), and the National Center for Competency Testing (NCCT). These exams heavily emphasize the order of draw, often presenting scenarios where you must identify the correct sequence for specific test orders (e.g., knowing the light blue tube precedes the lavender tube). These questions ensure candidates understand how to prevent additive carryover.
Navigating State Regulations and Licensure
State laws vary. California, Louisiana, Nevada, and Washington have stringent requirements involving state licensure, approved training, and national exams. In other states, requirements are employer-driven. Even without a state license mandate, verify rules with your state health department. Many hospitals in non-licensure states still require certification as a quality benchmark.
Practical Steps for Certification Success
Enroll in a program accredited by agencies like the National Accrediting Agency for Clinical Laboratory Sciences (NAACLS). Training covers anatomy, safety, and a critical clinical rotation requiring 30 to 100 successful venipunctures. Use a skills checklist to track progress, focusing on unhesitating tube selection. Practice with scenarios involving multiple test orders. Study using mnemonics and by learning the chemical additives (e.g., Yellow/SPS, Green/Heparin). Detailed technical resources are available in the CLSI guidelines.
Entry Level Job Options and Career Paths
Certified phlebotomists have diverse opportunities: fast-paced hospital inpatient units (ER, ICU), high-volume outpatient draw centers (Quest, Labcorp), mobile phlebotomy (home/facility visits), donor centers, and home health agencies. Each role demands a deep understanding of the order of draw to ensure sample integrity during transport and processing.
Interview Strategies and Salary Expectations
In interviews, discuss technical skills and mastery of the order of draw to demonstrate a priority for accuracy and safety. Describe clinical scenarios where you prevented cross-contamination. Employers value candidates who explain the “why” behind the procedure. The national average salary for phlebotomists in 2025 ranges from $40,000 to $48,000 annually, with higher rates in major metros like New York or San Francisco. Research local data via the Bureau of Labor Statistics. Many facilities offer tuition reimbursement for further education in medical laboratory science.
Frequently Asked Questions
Is the order of draw the same for syringe draws and evacuated tubes?
Yes. You must follow the same sequence. When using a syringe, transfer blood into tubes using a safety transfer device. The risk of additive carryover exists during this transfer; for instance, filling an EDTA tube before a serum tube can cause false hyperkalemia. Verify this in the CLSI guidelines.
Why should I draw light blue tubes before serum tubes?
This prevents clot activators in serum tubes from contaminating the sodium citrate tube. Even trace amounts of activator can trigger premature clotting in coagulation studies (PT/PTT), leading to inaccurate results. The Mayo Clinic notes that while high-quality needles reduce risk, the standard practice remains drawing citrate first for safety.
Can I draw a coagulation tube after an EDTA tube?
No. Never draw a light blue tube after a lavender or pink tube. EDTA is a strong anticoagulant that binds calcium and contains potassium. Carryover into a coagulation tube interferes with calcium-dependent clotting factors, artificially prolonging clotting times. Always follow the sequence: Blue -> Red/Gold -> Green -> Lavender.
What happens if I draw the wrong tube first?
Drawing out of order causes cross-contamination. For example, drawing lavender before green contaminates the heparin sample with EDTA, potentially causing false low calcium or high potassium. The lab will likely reject the sample, requiring a redraw. If you realize the error during the draw, stop and restart with a fresh site.
How many times should I invert each tube?
Most tubes require 5 to 10 gentle inversions; light blue tubes require 3 to 4. One inversion is a complete turn upside down and back. Do not shake, as this causes hemolysis. Proper mixing prevents micro-clots. Refer to manufacturer instructions or the Center for Phlebotomy Education.
Are royal blue tubes always drawn last?
No. Royal blue tube placement depends on the additive. If it contains EDTA, draw it with other EDTA tubes. If it contains a clot activator, draw it with serum tubes. Always check the label and your facility’s protocol or the McLendon Clinical Laboratories tube guide.
How does the order of draw differ for capillary punctures?
The order is reversed. Collect EDTA tubes first to secure a CBC sample before platelets clump at the puncture site. Follow with other additive tubes, then serum tubes. This is critical for pediatric patients.
When should a discard tube be used?
Use a discard tube when drawing a light blue tube first with a butterfly needle. The tubing contains air that will underfill the citrate tube, disrupting the 9:1 ratio. Draw a small amount into a discard tube to clear the air, then collect the sample. See Express Lab collection tips.
What should I do if a tube is underfilled?
Underfilled tubes, especially sodium citrate and EDTA, are often rejected. Citrate tubes must be filled to at least 90% capacity. Never combine blood from two underfilled tubes, as this doubles the additive concentration and invalidates results.
Should I memorize tube colors or additives?
Prioritize learning additives and their functions. Manufacturers may vary colors slightly, but the chemistry (e.g., EDTA binds calcium) remains constant. Understanding test pairs (Lavender/Hematology, Green/Chemistry) aids efficiency. See the 2025 phlebotomy exam prep for study strategies.
Conclusions and Practical Takeaways
The routine order of draw serves as the primary defense against specimen contamination. It is a strict requirement for clinical accuracy, ensuring that additives from one tube do not migrate into the next. When you follow the standard path—Cultures, Blue, Serum, Green, EDTA, Gray—you protect the integrity of patient results and prevent dangerous medical errors caused by chemical interference.
Certification and Career Success
Mastering this knowledge is essential for passing certification exams from the NHA, ASCP, or NCCT, which place heavy emphasis on the order of draw and additive carryover. Beyond the exam, this skill defines professional reputation. Consistently providing clean, accurate specimens reduces redraws, improves patient satisfaction, and saves facility resources. High-quality work in the early stages of a career can lead to lead phlebotomist roles.
Practical Study Actions
To solidify this information, use flashcards matching tube colors with additives and departments. Practice the physical sequence using empty tubes to master the “push and pull” motion while reciting the order. Resources like the Free Phlebotomy Exam Order of Draw and Additives Test 2025 Study Guide offer visual aids. Use a competency checklist to grade yourself, and ask peers to critique your technique. Repetition is key to making the order of draw an automatic habit.
Pre-Draw Checklist
Review the Requisition
Confirm ordered tests and identify necessary tubes before approaching the patient.
Check Tube Integrity
Verify expiration dates and check for cracks. Expired tubes may have failed vacuums.
Arrange the Sequence
Place tubes in the exact draw order on your tray to prevent confusion.
Verify Patient Identity
Use at least two identifiers (e.g., name, DOB) for safety.
Prepare the Site
Clean thoroughly and ensure alcohol dries completely to prevent hemolysis.
Execute and Invert
Perform the draw and invert each tube gently immediately upon removal from the holder.
Final Guidance and Regulations
Always confirm specific protocols with your employer, as some facilities have unique rules for specialty testing. Consult your facility policy manual as the final authority. Stay updated on state regulations, particularly in licensure states like California and Washington. For the most current national standards, refer to the CLSI guidelines on the order of blood draw. Professional organizations like the Center for Phlebotomy Education provide ongoing education on how carryover affects patient care.
Sources
- [PDF] Phlebotomy Order of Draw | NCCT — This CE course will review the composition of blood, types of blood specimens, evacuated blood collection tubes, preanalytical variables, laboratory test …
- The Order of Draw – Center for Phlebotomy Education — This article not only reinforces today's recommended order of draw, but explains how additive carryover during the collection process can alter the test result.
- Order of Blood Draw Tubes and Additives – CLSI — Blood samples must be drawn by phlebotomists in a specific order to avoid cross-contamination of the sample by additives found in different collection tubes.
- Phlebotomy Top Gun: Order of Draw-Do We Still Care? – Insights — The guidelines suggest not collecting serum clot activator tubes before a citrate tube for coagulation study to avoid carryover of the clot …
- Free Phlebotomy Exam Order of Draw and Additives Test 2025 … — Free Phlebotomy Exam Order of Draw and Additives Test 2025 Study Guide Are you preparing for the Phlebotomy Certification Exam in 2025?
- Best practices in phlebotomy: Sticking with the basics | myadlm.org — The typical order of draw is: 1. blood culture bottles, 2. serum tubes (red top), 3. sodium citrate tubes (blue top, coagulation testing is …
- Evacuated Blood Collection Tube Guide | McLendon Clinical … — All tubes sterile. Standard order of draw: BLOOD CULTURES, royal blue, red, light blue, SST (Gold), green, tan, yellow, pink, pearl, lavender.
- Order of Draw – Express Lab — To avoid cross-contamination, blood must be drawn and collected in tubes in a specific order. This is known as the Order of Draw.
- Order of Draw for Blood Collection in the United States – Needle.Tube — The Clinical and Laboratory Standards Institute (CLSI) has established guidelines for the order of draw to prevent Cross-Contamination during blood collection.
Legal Disclaimers & Brand Notices
The information provided in this article is for informational and educational purposes only and does not constitute medical advice, professional diagnosis, or treatment. While every effort is made to ensure the accuracy of the clinical protocols described, healthcare professionals should always refer to the most current guidelines from the Clinical and Laboratory Standards Institute (CLSI) and their specific institutional policies before performing any medical procedure.
All product names, logos, and brands mentioned in this text are the property of their respective owners. All company, product, and service names used in this article are for identification purposes only. Use of these names, trademarks, and brands does not imply endorsement, affiliation, or sponsorship.