Understanding phlebotomy tube colors, additives, and proper handling is essential for accurate lab results and safe patient care. This article provides an in-depth, up-to-date chart of common tube types, their additives, order of draw, handling, and how mastery of these topics supports certification exams and success in entry-level phlebotomy jobs across the US.
Why tube color and additive knowledge matters for clinicians and new phlebotomists
Every time you pick up a needle, you hold a patient’s diagnosis in your hands. It sounds heavy because it is. The work of a phlebotomist goes far beyond just finding a vein. It is about chemistry and timing. If you grab the wrong tube or fill them in the wrong order, the lab results will be wrong. This is not just a minor inconvenience. It leads to doctors making the wrong decisions for their patients. Understanding the relationship between tube colors and additives is the foundation of clinical safety.
The Reality of Preanalytical Errors
Research shows that the vast majority of laboratory mistakes happen before the sample ever reaches a machine. A peer-reviewed study from 2018 in Clinical Chemistry and Laboratory Medicine found that preanalytical factors account for 46 to 68 percent of all lab errors. These are mistakes made during collection, handling, or transport. When a phlebotomist uses the wrong tube, the additive inside can completely change the blood chemistry. For example, using a lavender tube for a calcium test will show a result that is dangerously low because the EDTA binds to the calcium. This is a preanalytical error that can lead to a patient receiving unnecessary and potentially harmful treatment.
Financial and Clinical Costs
Mistakes in the drawing room have a high price tag. A 2021 study in the American Journal of Clinical Pathology reported that preanalytical errors cost United States laboratories roughly 1.2 million dollars annually for every 100,000 tests. For an employer, a single repeat draw costs between 50 and 100 dollars when you factor in labor and supplies. For the patient, it means another needle stick and a delay in care. In a hospital setting, a 2022 report from the College of American Pathologists noted that 12 percent of coagulation samples were rejected simply because light blue tubes were not filled to the correct level. This slows down critical surgeries and emergency room treatments.
Why Order of Draw Matters
The Clinical and Laboratory Standards Institute (CLSI) provides the guidelines we follow to prevent cross-contamination. This is known as the order of draw. If you draw a lavender tube before a green one, a tiny amount of EDTA can carry over into the next tube. This carryover can falsely increase potassium levels or decrease platelet counts. A 2020 study showed that EDTA contamination can drop a platelet reading by 20 to 50 percent. This is called pseudothrombocytopenia. It might lead a doctor to believe a patient has a bleeding disorder when they are actually perfectly healthy. Following the CLSI H3-A6 standards is the only way to ensure the integrity of every sample.
Certification and Career Success
If you are preparing for your certification, you must know your tubes. The ASCP Phlebotomy Technician exam dedicates about 10 to 15 percent of its questions to tube identification and the order of draw. The NHA Certified Phlebotomy Technician exam places even more weight on this, with nearly 30 percent of the test covering specimen collection. Employers like Quest Diagnostics or LabCorp use these topics to screen new hires. During a typical orientation, you might face a tube quiz where a 95 percent score is required to start working. They want to see that you understand Tube Colors and the Tests They Are Used For | Phlebotomy USA before you ever touch a patient.
Common Real-World Mistakes
One of the most frequent errors involves the light blue tube used for PT and INR tests. These tubes must be filled to at least 90 percent of their capacity. If they are underfilled, the ratio of blood to the sodium citrate anticoagulant is wrong, which can make a patient’s blood look like it clots slower than it actually does. Another common mistake is failing to invert the tubes. Most tubes need to be turned upside down gently between five and ten times immediately after the draw. If you skip this, micro-clots can form. These tiny clots will clog the lab instruments and ruin the test results for a CBC or a metabolic panel.
Daily Practice Checklist
Memorizing these steps will help you avoid the most common pitfalls in a busy clinic or hospital environment.
- Verify the patient identity using two unique identifiers.
- Check the laboratory requisition to match tests with the correct tube colors.
- Arrange your tubes in the strict CLSI order of draw before starting the venipuncture.
- Ensure every anticoagulant tube is filled to the designated fill line.
- Invert each tube gently the required number of times immediately after removal from the holder.
- Label every sample at the bedside while the patient is still present.
- Check if any specific samples like ammonia or lactate need to be placed on ice right away.
By mastering these details, you protect your patients and your professional reputation. Knowing your additives is not just about passing a test. It is about being a reliable part of the healthcare team. You can find more details on specific requirements in this Tube Chart – Pathology Centre guide. Accuracy in the first few minutes of a blood draw ensures accuracy in the final diagnosis.
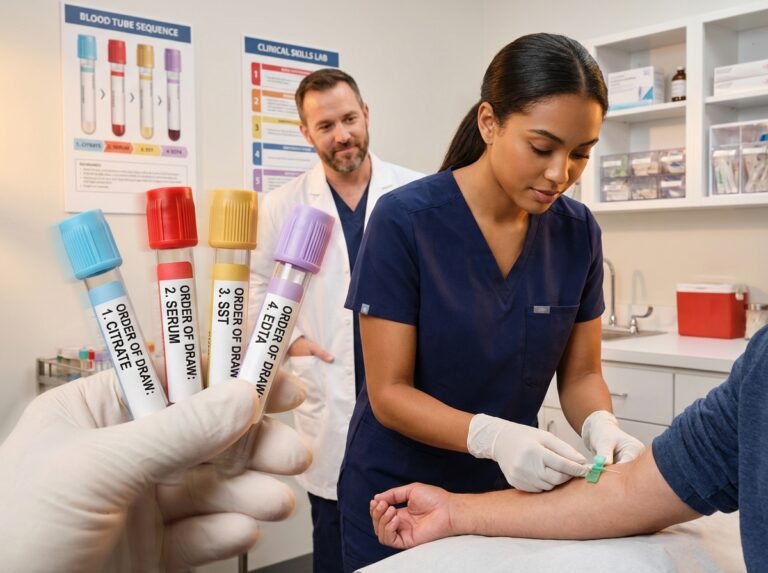
The ultimate tube color chart with additives tests and typical handling
Every tube in your collection tray serves a specific chemical purpose. The color of the cap tells you what is inside and how the blood will react once it leaves the vein. Most certification exams like the ASCP or NHA focus heavily on these details. You must know the additive and the mechanism of action. You must also know which tests belong in which tube to ensure patient safety.
Manufacturers like BD and Greiner Bio-One provide specific instructions for use. These guidelines align with CLSI standards to prevent preanalytical errors. The following information reflects the current 2025 standards for US clinical laboratories.
| Tube Color | Additive and Action | Common Tests | Inversions and Fill | Handling and Stability |
|---|---|---|---|---|
| Light Blue | 3.2% Sodium Citrate. Binds calcium to prevent clotting. This process is reversible. | PT, INR, PTT, Fibrinogen, D-Dimer. | 3 to 4 inversions. Must be filled to the 90% mark minimum. | Stable for 4 hours at room temperature for PT. 24 hours if refrigerated. |
| Red (Glass) | No additive. Blood clots naturally through contact with the glass surface. | Serum chemistry, Serology, VDRL. | 0 inversions. Gentle handling only. | Wait 60 minutes for a full clot. Serum is stable for 7 days at room temperature. |
| Red (Plastic) | Silica clot activator. The silica particles increase the surface area for clotting. | Antibody screening, TSH, Free T4. | 5 inversions. Required to mix the activator with the blood. | Wait 30 minutes for a clot. Centrifuge for 10 minutes at 1300g. |
| Gold or Tiger Top (SST) | Thixotropic gel and silica activator. The gel creates a physical barrier between cells and serum. | CMP, BMP, Lipid panel, Liver function, Electrolytes. | 5 inversions. Fill to capacity for proper gel positioning. | Wait 30 minutes to clot. Stable for 5 days when refrigerated. |
| Orange (RST) | Thrombin based clot activator. This allows for very fast serum separation. | STAT Chemistry tests. | 8 inversions. Essential for rapid action. | Clots in only 5 minutes. Ideal for emergency department samples. |
| Light Green (PST) | Lithium Heparin and gel. Heparin inhibits thrombin to provide plasma. | Electrolytes, Troponin, CK-MB, BNP. | 8 to 10 inversions. Prevents micro-clots in the plasma. | No wait time for clotting. Process within 2 hours. |
| Dark Green | Sodium Heparin or Lithium Heparin. No gel barrier is present. | Ammonia, Sodium Heparin for flow cytometry. | 8 to 10 inversions. | Ammonia must be placed on ice immediately. Stable for 3 hours. |
| Lavender or Purple | K2 EDTA or K3 EDTA. Binds calcium permanently to preserve cell shape. | CBC, HbA1c, ESR, Reticulocyte count. | 8 to 10 inversions. Over-mixing causes hemolysis. | Stable for 24 hours at room temperature for CBC. HbA1c is stable for 7 days. |
| Pink | K2 EDTA. Specifically labeled for blood bank use. | ABO Typing, Rh factor, Crossmatch, Antibody screen. | 8 to 10 inversions. | Requires 6 to 8 mL of blood for blood bank procedures. |
| Gray | Sodium Fluoride and Potassium Oxalate. Fluoride stops glucose metabolism. | Glucose, Blood Alcohol (BAC), Lactate. | 8 inversions. | Glucose is stable for 3 days at room temperature. Lactate requires ice. |
| Royal Blue | May contain EDTA or no additive. Certified to be trace element free. | Lead, Zinc, Arsenic, Mercury, Copper. | 8 inversions if additive is present. | Avoid using alcohol wipes with metal content. Use specialized needles. |
| Yellow (SPS) | Sodium Polyanethol Sulfonate. Stabilizes bacterial growth. | Blood cultures. | 8 to 10 inversions. | Transport to the lab within 2 hours. Keep at room temperature. |
| Yellow (ACD) | Acid Citrate Dextrose. Preserves red cell viability. | DNA testing, HLA typing, Paternity tests. | 8 inversions. | Stable for 24 hours at room temperature. |
| Tan | Certified lead-free K2 EDTA. | Lead testing only. | 8 to 10 inversions. | Stable for 7 days at room temperature. |
| Black | Buffered Sodium Citrate. Used for specific sedimentation rates. | ESR (Westergren method). | 8 to 10 inversions. | Must be tested within 2 hours of collection. |
Practical Handling and Troubleshooting
Managing Underfilled Tubes
A short draw is a major cause of specimen rejection. This is especially true for the light blue tube. The 9 to 1 ratio of blood to citrate is non-negotiable. If the tube is underfilled by more than 10 percent, the results for PTT can be falsely prolonged. Always use a discard tube when using a butterfly needle to prime the tubing. This ensures the first clinical tube reaches the proper volume. You can find more details on tube colors and the tests they are used for to help memorize these requirements.
Labeling and Integrity
Label every tube at the bedside immediately after the draw. Include the patient name, date of birth, time of collection, and your initials. Never label tubes before the blood is inside. For serum tubes, you must wait for the clot to form before placing them in the centrifuge. If you spin a gold or red tube too early, fibrin will remain in the serum. This can clog laboratory instruments and require a redraw. Refer to the manufacturer tube chart for specific centrifuge speeds.
Temperature Sensitive Samples
Some analytes break down quickly at room temperature. Ammonia and lactic acid are the most common examples. These tubes must be placed in an ice slurry immediately. Do not use large ice cubes because they can cause the glass to break or the blood to freeze. Freezing the sample leads to hemolysis. Hemolysis releases potassium from the red cells into the plasma. This creates a false elevation that can lead to dangerous medical decisions.
Pediatric and Geriatric Considerations
Small volumes are common in pediatric care. Microtainers use the same color coding as standard tubes. A lavender microtainer still contains EDTA and requires 8 to 10 inversions. For geriatric patients with fragile veins, you might use smaller 2 mL tubes. These tubes reach their vacuum capacity faster. They help prevent vein collapse while maintaining the correct additive ratio.
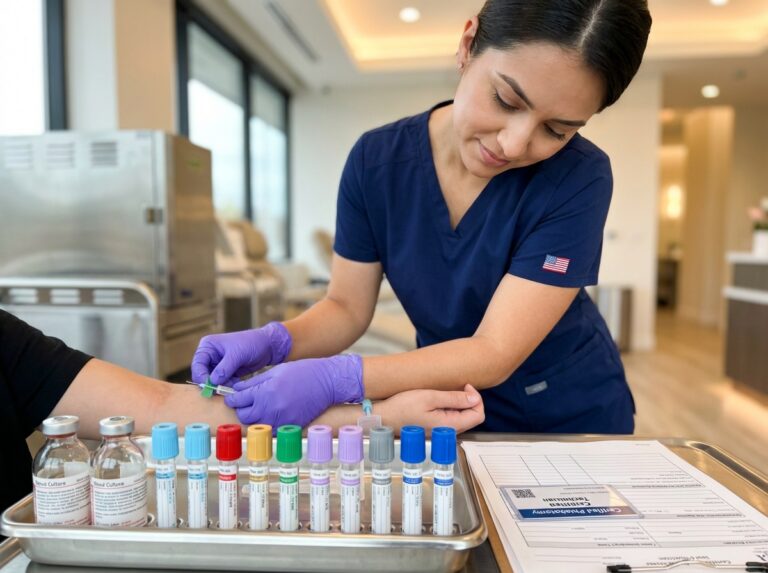
Order of draw mixing and contamination prevention practical guide
The order of draw is the most important rule in phlebotomy. It exists to stop additives from moving from one tube to the next. This movement is called carryover. It ruins lab results and leads to wrong diagnoses. The Clinical and Laboratory Standards Institute (CLSI) provides the standard sequence in the H3 A6 document. Most labs in the United States follow this strictly to ensure patient safety.
The Standard Sequence
You must follow the sequence exactly as listed. First is the blood culture tube. These must stay sterile. Any skin bacteria or tube additives will ruin the culture. Second is the light blue tube for coagulation. This tube contains sodium citrate. It must be filled to the line. Third are serum tubes. These include plain red glass or plastic tubes with clot activators. Gold or tiger top tubes with gel also fall here. Fourth are heparin tubes. These are green. They are used for plasma chemistry. Fifth are EDTA tubes. These are lavender or pink. EDTA is a strong anticoagulant. Sixth are gray tubes. These have sodium fluoride and potassium oxalate. They are for glucose and alcohol testing.
Specialty Tube Placement
Specialty tubes like royal blue for trace metals have specific spots. If the royal blue tube has no additive, it goes with serum tubes. If it has EDTA, it goes after the lavender tube. Yellow ACD tubes for genetic testing usually go at the end of the draw. You should check your lab manual for specific rules on these tubes. Some facilities have unique protocols for rare tests.
Mechanisms of Additive Carryover
Carryover happens when the needle touches the additive in one tube and carries it into the next. This causes chemical interference. EDTA is a common culprit. It is a chelating agent. It binds metal ions like calcium and magnesium. If EDTA gets into a serum tube meant for calcium testing, the result will be falsely low. This same EDTA carryover often adds potassium to the sample. A patient might get treated for high potassium they do not actually have. Heparin carryover into a blue tube will make a PT or PTT test invalid. It interferes with the clotting process the lab is trying to measure. Sodium fluoride in gray tubes can damage cell membranes. If it carries over into other tubes, it can cause hemolysis or ruin enzyme tests.
Case Examples of Errors
One common error is drawing a lavender tube before a gold tube. The EDTA from the lavender tube binds the calcium in the gold tube. The lab sees a calcium level that is incompatible with life. Another error involves the light blue tube. If you draw it after a heparin tube, the clotting times will be extremely long. The doctor might think the patient is at risk of bleeding. These errors lead to unnecessary treatments and extra costs for the hospital.
Mixing and Inversions
Mixing is not shaking. Shaking causes hemolysis, where red blood cells rupture and release contents like potassium into the plasma. This turns the serum pink or red and often requires a redraw because it produces false elevations in analytes. To prevent this, use the correct needle size, avoid pulling a syringe plunger too quickly, and invert the tubes gently. Turn the tube upside down and back again. This is one inversion. Different tubes need different counts. Light blue tubes need 3 to 4 inversions. Serum tubes need 5 inversions. Heparin and EDTA tubes need 8 to 10 inversions. Gray tubes need 8 inversions. You must mix the tubes immediately after drawing them. If you wait, microclots will form. These clots ruin the sample for the lab machines.
Procedural Tips for Multi Draws and IVs
Butterfly sets require a discard tube. The 12 inch tubing holds about 0.5 mL of air. This air takes up space in the first tube. If the first tube is the light blue one, it will be underfilled. An underfilled blue tube has too much citrate for the amount of blood. This makes clotting times look longer than they are. Use a plain red or another blue tube as a discard to clear the air.
You should generally avoid drawing from an arm with a running IV. The IV fluids will dilute the blood sample and contaminate the results. Always use the opposite arm. If that is not possible, follow your facility protocol for drawing below the IV site after the infusion has been turned off for a set period. Always document if a draw was performed near an IV site so the lab can interpret the results correctly.
For pediatric patients, use microtubes. The order of draw for microtubes is different. You must collect the EDTA tube first. This prevents microclots from forming in the small sample. After EDTA, collect other additive tubes. Serum tubes come last in capillary collections. This is the opposite of the venipuncture order. It is necessary because capillary blood clots very fast. You can find more details on tube colors and the tests they are used for to help you memorize these rules.
Accrediting Bodies and Guidelines
Major laboratory accrediting bodies like the College of American Pathologists (CAP) and the CDC follow CLSI standards. They check for order of draw compliance during inspections. Following these rules is a requirement for certification and employment. It shows you are a professional who cares about accuracy. Always stay updated on the latest CLSI H3 A6 revisions. These guidelines are the foundation of safe phlebotomy practice in the United States.
Linking tube knowledge to certification exams training and first job skills
Mastering the chart of tube colors and additives is the first major hurdle for any aspiring phlebotomist. This knowledge is the foundation for passing national certification exams. It is also the primary skill employers look for during the hiring process. Major US certifying organizations like the American Society for Clinical Pathology (ASCP), the National Healthcareer Association (NHA), and American Medical Technologists (AMT) expect candidates to have these details memorized.
The ASCP Phlebotomy Technician (PBT) exam blueprint for 2024 and 2025 allocates about 10 to 15 percent of its questions to tube identification. This includes the order of draw. The NHA Certified Phlebotomy Technician (CPT) exam places these topics within the specimen collection domain. You must achieve a 70 percent pass rate to earn this credential. The AMT Registered Phlebotomy Technician (RPT) exam includes 20 specific questions on specimen handling. These questions cover additives. They also cover the number of times a tube must be inverted.
Exam domains across these organizations follow a similar structure. You will be tested on the specimen collection procedure. This involves selecting the right equipment for the patient. You must understand the order of draw to prevent additive carryover. Tube identification is another core domain. You need to know which additive is in a lavender tube. You must know why a green tube contains heparin. Patient identification and safety are equally important. You will answer questions about verifying patient names. You will be tested on infection control. This includes proper hand hygiene. Specimen handling and transport are the final pieces. Some samples require ice. Others need protection from light.
Training programs provide the hands-on experience needed to meet these standards. The number of supervised procedures varies by the certifying body. ASCP requires 100 successful venipunctures. It also requires 5 skin punctures. NHA guidelines for 2025 require 30 venipunctures. They require 10 skin punctures. AMT requires documentation of 100 successful venipunctures. Many trainees find they need between 50 and 100 draws to feel truly competent. High-volume environments like the Mayo Clinic may require up to 200 draws during their internal training.
Effective study habits make a difference. Flashcards are a proven tool for memorizing the 20 most common tubes. Aim for 80 percent recall within two weeks of starting your studies. Practice simulated draws by arranging empty tubes in the correct order. Do this without looking at your notes. Timed practicals are helpful. Try to identify and order 10 different tubes in less than five minutes.
Sample test questions often focus on specific scenarios. You might see a question asking which tube is used for a PT or INR test. The correct answer is the light blue tube with sodium citrate. Another question might ask how many times you should invert a lavender tube. The answer is 8 to 10 times. You might be asked what happens if you draw a lavender tube before a light blue tube. This would cause additive carryover. It would lead to incorrect results.
Your first job will involve a period of orientation. Employers like Quest Diagnostics or LabCorp use competency checks. They will observe you performing at least five draws. They will check your tube selection. They will watch your inversion technique. You will learn to use the facility documentation system. You might receive a ribbon or badge for access to lab areas.
Daily tasks depend on your work setting. In a clinic, you might perform 20 to 50 draws per shift. You will focus on routine tests. In a hospital, you will handle STAT draws. These require immediate processing. Blood banks use pink tubes for crossmatching. Mobile phlebotomy requires you to manage your own supplies. You must handle transport carefully.
To demonstrate mastery quickly, carry a quick-reference pocket card. It shows you are organized. Use checklists for every draw. This prevents errors. Communicate confidently with lab staff. If you are unsure about a rare test, ask for clarification. This shows professional responsibility.
Requirements for clinical practice change. You should verify current eligibility with each certifying body. Check the ASCP website. Visit the NHA or AMT portals. State health departments in California, Nevada, and Washington have specific licensing rules. Always check their official sites for the latest regulations. You can find more details on tube types through resources like Phlebotomy USA or by reviewing a Siny Medical guide. Understanding these color codes is the first step toward a successful career.
Key takeaways and practical next steps for new phlebotomists
Mastering the tray starts with a solid grasp of why each tube exists. Preanalytical errors cause nearly 70 percent of laboratory mistakes. Most of these happen before the blood even reaches the centrifuge. You can prevent these by sticking to the order of draw. You must also ensure proper additive mixing. A light blue tube that is underfilled by even 10 percent can change a PT/INR result by 15 percent. This directly impacts patient care. It can lead to incorrect medication dosing.
Immediate Study Actions
Flashcard Mastery
Create cards for the 20 most common tubes. Focus on the additive. Include the common tests. Note the inversion count. Aim for 80 percent recall within two weeks. This builds the muscle memory needed for high volume shifts. You should be able to identify a tube by its cap color instantly. You should also know if it requires a full draw or a specific number of inversions.
Order of Draw Drills
Memorize the CLSI sequence. This starts with blood cultures. It moves to light blue. It continues to serum tubes like red or gold. It ends with heparin, EDTA, and glycolytic inhibitors. Practice this sequence until it becomes automatic. Carry a pocket chart during your clinical rotations. Use it to verify your tray setup before every patient encounter.
Additive Functions
Learn exactly what each chemical does. EDTA binds calcium to prevent clotting. Sodium citrate does the same but in a reversible way for coagulation studies. Heparin inhibits thrombin. Understanding these mechanisms helps you realize why carryover is so dangerous. For example, EDTA carryover into a green tube can falsely elevate potassium levels. It can also drop calcium readings. This knowledge makes you a safer practitioner.
On the Job Strategies
The First Week Protocol
Shadow at least 10 draws before flying solo. Watch how experienced phlebotomists handle difficult veins. Observe how they manage their workflow. Ask to see the facility Standard Operating Procedure manual. Every lab has specific rules for processing. Some might require different clot times for serum tubes. Others might have unique rules for transport on ice. Always follow the local SOP over general textbook knowledge.
Double Check Labels
Verify patient identity using two unique identifiers. Check the labels against the requisition form. Ensure the tube type matches the requested test. If you use a butterfly needle, remember the discard tube. This clears the air from the tubing. It ensures the first additive tube fills completely. This is vital for light blue tubes. They must reach the nominal fill mark to maintain the 9:1 blood to additive ratio.
Manufacturer Instructions
Read the Instructions for Use from the tube manufacturer. BD Vacutainer and Greiner Bio-One might have slight differences in recommended inversions. Most serum tubes need 5 to 10 inversions. Most anticoagulant tubes need 8 to 10. Gentle inversions prevent hemolysis. They also ensure the blood mixes with the additive immediately. Never shake a tube. Shaking causes red blood cell rupture. This leads to sample rejection.
Certification and Professional Growth
Exam Preparation
Prepare for the ASCP, NHA, or AMT exams. These bodies require a high level of proficiency in specimen handling. The ASCP PBT exam allocates about 15 percent of its questions to tube identification. Use official practice tests. Focus on the 2025 exam blueprints. These reflect current CLSI standards. Keep a detailed log of your clinical hours. Most agencies require 100 successful venipunctures. Some require a specific number of skin punctures as well.
State Requirements
Check your state health department rules. California, Nevada, and Washington have specific certification mandates. Other states might not require a license. However, most employers prefer certified candidates. Verification can be done through the official websites of the certifying agencies. This ensures your credentials remain active and valid.
Specialty Opportunities
Look into advanced certifications after your first year. You might specialize in blood bank collections. You could move into pediatric phlebotomy. You might explore mobile insurance exams. Networking with laboratory managers can open these doors. Join professional organizations. Attend local workshops. Stay updated on new technology. This includes needleless collection systems or new stabilization additives.
Mastering tube selection is the foundation of your career. It is the first step in ensuring diagnostic accuracy. This discipline protects your patients. It also protects your professional reputation. Consistent practice will turn these complex charts into second nature. Your dedication to these details makes you an essential part of the healthcare team. Every successful draw starts with the right choice at the tray.
References
- Tube Colors and the Tests They Are Used For | Phlebotomy USA — This article is here to help. We'll explain what the different colors mean and the tests associated with each.
- Understanding the Importance of the Blood Test Tube Color Chart … — Each color of the tube indicates specific additives or anti-coagulants that are necessary for various types of blood tests.
- Phlebotomy Test Tubes (Color-Coded) – Red, Blue, Lavender, Gold … — Phlebotomy Test Tubes (Color-Coded) – Red, Blue, Lavender, Gold, Green, Gray – Labs · Comments.
- [PDF] Tube Chart – Pathology Centre — Ensure that the correct blood-to-additive ratio is met by checking the draw volume against the nominal fill mark on the tube or by holding tube up to this …
- [PDF] Test Tube Color Chart — Blood Alcohol/Ethanol. Serum. 6d. PMHG. BUN. Serum. 5d. PMHG. C3. Serum. 3d. H. C4. Serum. 6d. H. Calcium. Serum. 6d. PMHG. Carbon Dioxide. Serum. 3d. PMHG. CK.
- Decoding the Colour Codes of Evacuated Blood Collection Tubes — Every evacuated blood collection tube is covered with a colour-coded plastic or rubber cap. The colour helps indicate the type of additives in the tube.
- Understanding the Specific Additives and Tests Associated with … — Test tube color charts serve as a vital tool for medical laboratory professionals in the United States, helping them identify the specific additives and tests …
- What Color Tubes Are Used for Which Tests in Phlebotomy | Siny — Each color represents a specific type of additive that prepares the blood sample for particular laboratory tests. In this blog, we will explore …
Legal Disclaimers & Brand Notices
The content provided in this article is for informational purposes only and does not constitute medical advice, diagnosis, or treatment. Always seek the advice of a qualified healthcare provider with any questions regarding a medical condition or clinical procedure.
All product names, logos, and brands mentioned in this text are the property of their respective owners. All company, product, and service names used in this article are for identification purposes only. Use of these names, logos, and brands does not imply endorsement.