Memorizing Vacutainer tube colors and the correct order of draw is essential for accurate lab results and patient safety. This guide links tube color knowledge with practical phlebotomy career steps—from training and certification choices to entry‑level job options across the US—and gives tested memorization techniques and real‑world handling tips to pass exams and perform reliably on the job.
Why tube colors matter for accuracy, safety, and standards
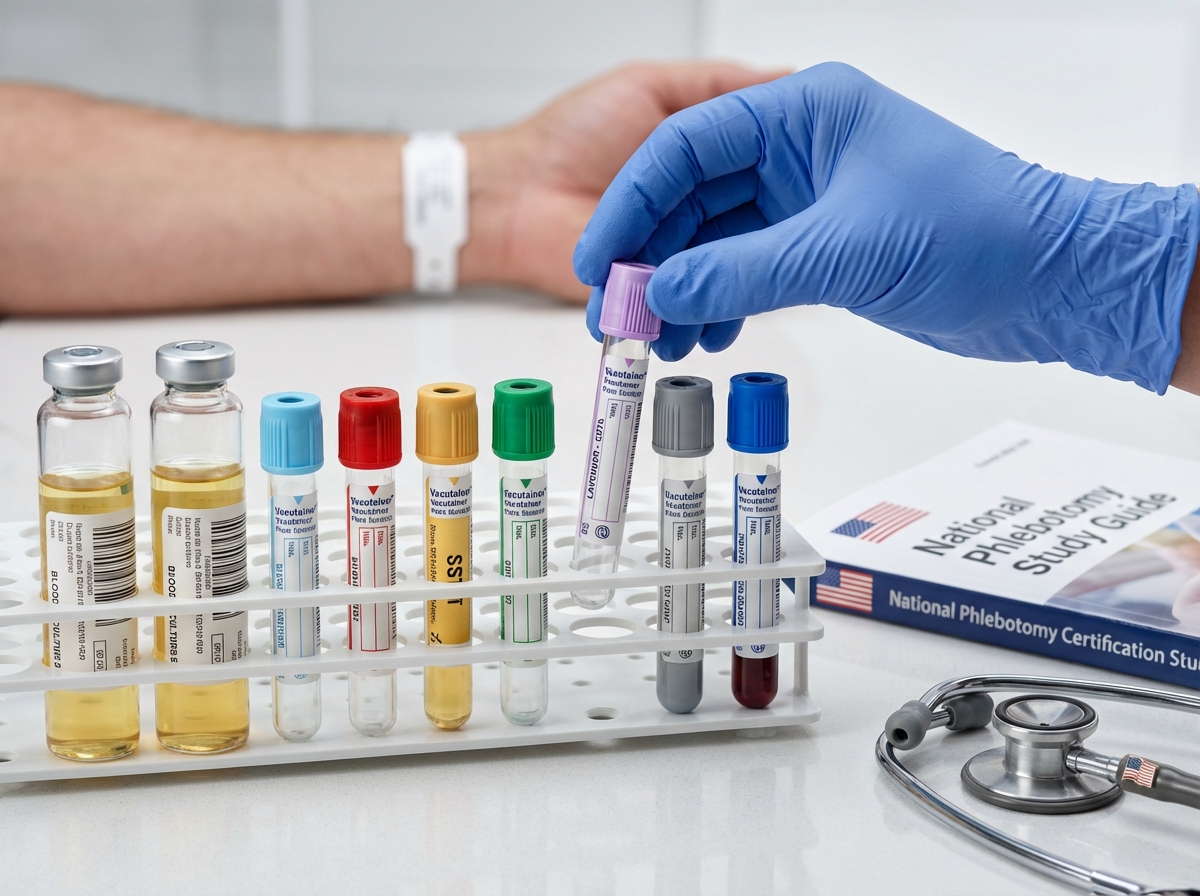
The color of a Vacutainer cap serves as a critical safety signal in every medical facility. These colors are not chosen at random; they represent specific chemical additives that prepare a blood sample for different types of analysis. Following the standardized color code plus the correct order of draw is the only way to ensure laboratory accuracy. When these protocols are ignored, the risk to patient safety increases significantly.
Most mistakes in laboratory medicine happen before the blood ever reaches an analyzer. These are known as preanalytical errors. Data from the Clinical and Laboratory Standards Institute (CLSI) suggests that nearly 70 percent of all diagnostic errors occur during the collection or handling phase. These errors lead to delayed treatments or incorrect diagnoses. Common causes include sample contamination, using the wrong additive, or underfilling a tube. Hemolysis is another major issue. It occurs when red blood cells rupture due to rough handling or improper needle size. This single error accounts for roughly 40 to 50 percent of all rejected lab samples.
The CLSI provides the reference standard for phlebotomy procedures in the United States. Their document known as GP41 is the primary guide for the order of draw. While different manufacturers like BD or Greiner Bio-One might have slight variations in their specific tube designs, they all align with CLSI standards to maintain consistency across the industry. Employers expect phlebotomists to follow these national standards alongside specific facility procedures. You can find more details on these standards in this guide on Understanding the Color Codes Used for Vacutainers in the United States.
The order of draw is designed to prevent additive carryover. This happens when the needle transfers a tiny amount of chemical from one tube into the next. Even a microscopic drop can ruin a test result. For example, if you draw a lavender tube before a green tube, the EDTA in the lavender cap can contaminate the sample. EDTA works by binding calcium and it contains high amounts of potassium. If that sample is tested for electrolytes, the results will show a false spike in potassium. This is called pseudohyperkalemia. A doctor seeing that result might believe the patient is having a cardiac emergency when the blood is actually normal.
Another common error involves the light blue sodium citrate tube. This tube is used for coagulation studies like PT or PTT. It requires a very specific ratio of nine parts blood to one part additive. If the tube is underfilled, the concentration of citrate will be too high. This prevents the blood from clotting properly during the test. It often results in a falsely prolonged clotting time. In a real-world scenario, a patient on blood thinners might have their medication dosage changed based on this incorrect data. This could lead to dangerous internal bleeding.
The legal implications for a phlebotomist are serious. Every sample you draw is a legal document of a patient’s health status at a specific moment. If a sample is rejected because of a collection error, it must be documented clearly. Frequent errors can lead to disciplinary action or the loss of certification. In cases involving forensic testing or workplace drug screens, you must follow a strict chain of custody. This process ensures that the sample was never tampered with from the moment of collection to the final report.
Quality control also involves recognizing rejection criteria. Labs will reject samples that are clotted when they should be liquid. They will also reject samples that are hemolyzed or collected in the wrong container. Understanding these rules helps you avoid the need for a redraw. Redrawing blood is not just an inconvenience; it causes physical pain to the patient and increases the cost of healthcare. Each rejected sample costs a laboratory an average of 150 dollars in lost time and materials.
To maintain high standards, you must be familiar with the specific additives in each tube:
- Sodium Citrate
Found in light blue tubes. It prevents clotting by binding calcium. It is used for coagulation tests. - EDTA
Found in lavender or pink tubes. It preserves the shape of blood cells. It is the standard for hematology and blood banking. - Heparin
Found in green tubes. It inhibits thrombin to prevent clotting. It is often used for chemistry tests that require plasma. - Sodium Fluoride
Found in gray tubes. It stops cells from metabolizing glucose. This is vital for accurate blood sugar testing.
The timing of the draw is just as important as the color of the tube. If a sample sits too long before being processed, the chemistry changes. For instance, glucose levels can drop by 5 to 10 percent every hour if the blood is not collected in a gray tube with a glycolytic inhibitor. Potassium levels can also rise as it leaks out of the cells over time. The CDC emphasizes that reducing these preanalytical errors is a top priority for improving patient safety across the US healthcare system.
Accuracy starts with the very first tube. If you are using a butterfly needle, you must use a discard tube before filling a light blue tube. This removes the air from the tubing so the citrate tube can fill completely. Small details like this are what separate a certified professional from an amateur. By adhering to the CLSI guidelines, you protect the patient and the integrity of the medical profession. Understanding these chemical interactions is the foundation for mastering the specific sequence of tubes used in daily practice.
Standard order of draw and the practical rundown of each tube
The sequence of blood collection is a strict protocol designed to prevent cross-contamination between different tube additives. This sequence is known as the order of draw. It follows the Clinical and Laboratory Standards Institute (CLSI) GP41-A7 standards. If you ignore this order, you risk carryover. Carryover happens when the needle transfers a tiny amount of an additive from one tube into the next. For example, the EDTA in a lavender tube binds calcium and contains potassium. If EDTA enters a tube meant for chemistry testing, it can cause a false high potassium reading and a false low calcium reading. Such errors can lead to incorrect diagnoses or unnecessary treatments.
The standard order begins with sterile collections and moves toward tubes with additives that are less likely to interfere with a wide range of tests.
| Order | Tube Color | Common Additive | Primary Use |
|---|---|---|---|
| 1 | Blood Cultures | SPS or Culture Broth | Microbiology (Bacteria/Yeast) |
| 2 | Light Blue | 3.2% Sodium Citrate | Coagulation (PT, PTT) |
| 3 | Red / Tiger / Gold | Clot Activator / Gel | Serum Chemistry, Serology |
| 4 | Green / Light Green | Lithium or Sodium Heparin | Plasma Chemistry, Electrolytes |
| 5 | Lavender / Purple / Pink | EDTA (K2 or K3) | Hematology, Blood Bank |
| 6 | Gray | Sodium Fluoride / Oxalate | Glucose, Lactic Acid, Alcohol |
Blood Cultures and Sterile Tubes
These are always drawn first to maintain a sterile environment. Any contact with non-sterile tube stoppers before the culture bottles could introduce skin bacteria into the sample. This results in a false positive. You should invert these bottles 8 to 10 times immediately after collection. Rejection usually occurs due to contamination or improper volume.
Light Blue (Sodium Citrate)
This tube is used for coagulation studies like PT and PTT. It contains a 3.2% sodium citrate solution. The ratio of blood to additive must be exactly 9 to 1. Most tubes have a clear fill line. If the tube is underfilled, the excess citrate will neutralize the calcium in the blood and prolong clotting times in the lab. This leads to inaccurate results. If you use a winged collection set (butterfly), you must use a red or clear discard tube first. This clears the air out of the tubing so the blue tube fills completely. Invert this tube 3 to 4 times.
Red, Gold, and Tiger Top (SST)
Red tubes are plain and may contain a clot activator. Gold or tiger tops are Serum Separator Tubes (SST). They contain a gel that moves during centrifugation to separate the serum from the cells. These are used for chemistry, immunology, and serology tests. You must invert these 5 times to ensure the clot activator mixes with the blood. A common cause for rejection is hemolysis or failing to let the tube sit upright for 30 minutes to clot before spinning.
Green and Light Green (PST)
Green tubes contain heparin, which prevents clotting by inhibiting thrombin. Light green tubes often have a gel separator and are called Plasma Separator Tubes (PST). These are ideal for “stat” chemistry because the lab can spin them immediately without waiting for a clot. They are used for electrolytes, ammonia, and troponin levels. Invert these 8 to 10 times. Rejection often happens if the sample is clotted because of poor mixing.
Lavender, Purple, and Pink (EDTA)
These tubes contain EDTA, which preserves the shape of blood cells by binding calcium. Lavender is the standard for a Complete Blood Count (CBC) and HbA1c. Pink tubes are specifically for blood bank cross-matching. Both require 8 to 10 inversions. If you do not mix them well, tiny clots will form. These micro-clots make the sample useless for automated cell counters.
Gray (Sodium Fluoride and Potassium Oxalate)
The gray tube is used for glucose and blood alcohol testing. Sodium fluoride is a glycolytic inhibitor. It stops the red blood cells from eating the glucose in the tube. This allows the glucose level to remain stable for up to 24 hours at room temperature. Potassium oxalate acts as the anticoagulant. Invert these 8 to 10 times. Rejection is common if the tube is underfilled or if the blood hemolyzes.
Royal Blue (Trace Elements)
These tubes are specially manufactured to be free of metal contaminants. They can come with no additive (red label) or with EDTA (lavender label). They are used for testing lead, zinc, or copper levels. The order of draw for royal blue depends on the additive inside. If it has no additive, it follows the red tubes. If it has EDTA, it follows the lavender tubes. Always check the label before drawing.
Pediatric and Capillary Considerations
When performing a capillary draw on a child or an adult with difficult veins, the order of draw changes. For skin punctures, you must collect the EDTA (lavender) microtainer first. This is because platelets begin to clump at the site of a skin puncture almost immediately. Collecting the anticoagulated tube first ensures the sample does not clot. After the EDTA, you collect other additive tubes, then finally the serum tubes.
Handling and Inversion Summary
Proper handling is as important as the order itself. Every tube with an additive requires immediate, gentle inversion. Do not shake the tubes. Shaking causes hemolysis, which is the rupture of red blood cells. Hemolysis releases intracellular contents like potassium into the plasma, ruining the chemistry results. Most manufacturers recommend 5 to 10 inversions depending on the tube type. Always verify the specific requirements in your facility’s procedure manual or the manufacturer’s package insert. Following these steps ensures the integrity of the specimen from the moment it leaves the patient’s arm until it reaches the laboratory analyzer.
Specialty tubes: uncommon colors and specimen handling pitfalls
While the standard colors like lavender and light blue make up the bulk of a daily draw, specialty tubes require a higher level of precision. These tubes often handle tests for trace elements, genetic material, or rapid chemistry needs. Missing a specific handling requirement for these can lead to immediate sample rejection or, worse, inaccurate patient results. Understanding these less common colors is what separates a basic collector from a high-level professional.
Specialty Tubes and Their Specific Uses
Royal Blue Trace Element Tubes
Royal blue tubes are designed for toxicology and nutritional chemistry. You will use them to test for metals like zinc, copper, or aluminum. These tubes come in two varieties. One contains K2EDTA and the other has no additive. The label usually indicates which one you have. Because these tests look for tiny amounts of metals, the glass and stopper are specially treated to be trace element free. Contamination is the biggest risk here. Even the dust in the air or the wrong type of needle can ruin the sample. Always check if your lab requires a specific lot number for the needles used with these draws.
Tan Lead Testing Tubes
Tan tubes are used specifically for lead determinations. While royal blue tubes can sometimes be used for lead, the tan tube is certified to contain less than 0.01 micrograms per milliliter of lead. They typically contain EDTA as an anticoagulant. These are common in pediatric settings where lead screening is routine. You must ensure the tube is filled to the correct volume to maintain the proper blood to additive ratio. Underfilling can lead to hemolysis or skewed results.
Black ESR Tubes
Black top tubes are used for the Erythrocyte Sedimentation Rate, or ESR. These contain a buffered sodium citrate solution. The ratio is different than the light blue tube, usually four parts blood to one part additive. These tubes must be filled exactly to the mark. Because the ESR test measures how fast red blood cells settle, any variation in the dilution will cause an incorrect reading. These samples are often time sensitive and should be tested within a few hours of collection.
White or Pearl PPT Tubes
White top tubes, also known as Plasma Preparation Tubes or PPT, are used for molecular diagnostic testing. This includes viral load tests for HIV or Hepatitis. They contain K2EDTA and a gel barrier. After centrifugation, the gel moves to separate the plasma from the cells. This is critical because it prevents the cells from contaminating the plasma during transport. Many molecular tests require the plasma to be removed or frozen shortly after the draw.
Orange Rapid Serum Tubes
Orange tubes, or RST, are used when the lab needs serum fast. They contain a thrombin-based clot activator. While a standard gold top tube takes thirty minutes to clot, an orange tube clots in about five minutes. These are vital in emergency departments for STAT chemistry tests. You must invert these five to six times immediately after the draw to ensure the thrombin mixes well with the blood.
Yellow ACD Tubes
Do not confuse these with the yellow SPS tubes used for blood cultures. Yellow ACD tubes contain Acid Citrate Dextrose. They are used for genetic testing, DNA analysis, and HLA typing for organ transplants. The ACD solution preserves the red blood cells and the viability of the white blood cells. These tests are expensive and often non-repeatable, so proper inversion and labeling are mandatory.
Critical Specimen Handling and Transport
Temperature and Light Sensitivity
Some specialty tests are destroyed by light or heat. Bilirubin or certain vitamins must be protected from light by wrapping the tube in aluminum foil or using amber-colored transport bags. Other tests, like ammonia or lactic acid, require the tube to be placed in an ice slurry immediately. If the sample reaches room temperature, the metabolism in the cells continues, which changes the chemical composition of the plasma.
Centrifugation Timing
Delayed centrifugation is a common cause of lab errors. For most chemistry tests, the serum or plasma should be separated from the cells within two hours. If the blood sits too long, the cells begin to consume glucose. This can drop the glucose levels by five to ten percent every hour. Potassium is also affected. As the cells sit, potassium leaks out of the red blood cells into the serum, causing a falsely high reading known as pseudohyperkalemia.
| Tube Color | Additive | Primary Use | Special Handling |
|---|---|---|---|
| Royal Blue | EDTA or None | Trace Elements | Avoid metal contamination |
| Tan | EDTA | Lead Testing | Certified lead free |
| Black | Sodium Citrate | ESR | Strict 4:1 ratio |
| White | EDTA + Gel | Molecular/Viral Load | Centrifuge within 2 hours |
| Orange | Thrombin | STAT Chemistry | Clots in 5 minutes |
| Yellow ACD | ACD Solution | DNA/Genetic | Maintain cell viability |
Preanalytical Pitfalls and Rejection Causes
Hemolysis Susceptibility
Hemolysis occurs when red blood cells rupture and release their contents into the serum or plasma. This is often caused by using a needle that is too small, pulling too hard on a syringe, or shaking the tubes instead of gently inverting them. Hemolyzed samples are the leading cause of rejection because they interfere with the colorimetric readings in lab analyzers. Specialty tubes for potassium or enzymes are particularly sensitive to this.
Contamination Risks
For trace element testing, even the antiseptic used on the skin can be a problem. If you are testing for iodine, you cannot use povidone iodine to clean the site. For lead testing, ensure the patient’s skin is thoroughly cleaned to remove any environmental lead dust. Always follow the order of draw to prevent additive carryover. For example, the EDTA in a tan or lavender tube can interfere with the calcium or potassium results in a green or gold tube.
Practical Checklist for Phlebotomists
- Verify the patient identity using two unique identifiers before starting the draw.
- Check the expiration date on specialty tubes as they often have a shorter shelf life than standard tubes.
- Ensure the tube is filled to the etched fill line to maintain the correct additive ratio.
- Invert the tubes the recommended number of times immediately after they are removed from the holder.
- Label every tube at the bedside in the presence of the patient.
- Check the lab manual for specific transport requirements like ice or light protection.
Escalating Unclear Orders
If you receive an order for a test you do not recognize, do not guess which tube to use. Specialty testing is expensive and often requires specific patient preparation. Consult your facility’s online test directory or call the laboratory directly. If the order is still unclear, contact the ordering physician for clarification. It is better to delay a draw by five minutes than to perform an incorrect collection that requires the patient to return for a redraw. Always verify local lab policies as some facilities may use different tube colors for specific proprietary tests. State rules can also dictate how certain specialty samples, like those for legal blood alcohol or forensic evidence, must be handled and documented.
For more details on standard colors, you can review Understanding the Color Codes Used for Vacutainers in the United States. Mastering these specialty tubes ensures you provide the highest quality of care and maintain the integrity of every specimen you collect.
Memorization techniques, study strategies, and career connections
Mastering the order of draw is a rite of passage for every phlebotomist. It requires more than just looking at a chart on the wall. You need to build a mental map that stays with you even when a patient is difficult or the clinic is loud. Many students find that multisensory learning is the most effective way to lock this information into long-term memory. This means you should see the colors, say the names out loud, and feel the tubes in your hands.
Mnemonics for the Order of Draw
Mnemonics are the most common tool for remembering the sequence. A popular short version is “Boys Love Rugby.” This helps you remember Blood cultures, Light blue, and Red. If you need to remember the full standard sequence, you can use the phrase “Be Careful Running Goats Greedily Like Great Friends.” This stands for Blood cultures, Citrate (light blue), Red, Gold (SST), Green, Lavender, and Gray (Fluoride). Some people prefer more vivid imagery to make the words stick. You might imagine a scene where a “Big Lion Roars Greatly Like a Giant.” This corresponds to Blood cultures, Light blue, Red, Gold, Green, Lavender, and Gray. Choose one phrase and repeat it until it becomes a reflex. You can find more details on these sequences in this Evacuated Blood Collection Tube Guide.
Color Association and Flashcards
Visual drills help bridge the gap between a phrase and the physical tube. Try to associate each color with a real-world object that relates to its function. Think of the light blue tube as the ocean and remember it uses sodium citrate to stop clotting. Think of the green tube as grass and associate it with heparin. You should create flashcards that have the tube color on one side. On the other side, list the additive, the number of inversions, and the common tests. Use a spaced repetition schedule to study these cards. Review them every day for the first week. Once you feel confident, move to every three days. This method ensures the information moves from your short-term memory into your permanent knowledge base.
Hands-on Practice with Simulated Sets
Physical practice is just as important as mental study. You can buy or create a practice kit with empty tubes. Practice the motion of reaching for the next tube in the correct order while you are at home. This builds muscle memory. You must also practice the correct number of inversions for each tube. Light blue tubes require three to four turns. Red and gold tubes require five turns. Green and lavender tubes require eight to ten turns. If you do not mix the additives properly, the sample may clot or yield inaccurate results. You can learn more about why these colors matter in this resource on Understanding the Color Codes Used for Vacutainers in the United States.
Practicing Under Stress
Working in a real lab is rarely quiet. You should practice your skills under simulated stress. Set a timer for three minutes and try to organize a full set of tubes in the correct order. Have a friend or family member talk to you or ask you questions while you do this. This helps you learn how to maintain your focus on the order of draw and labeling requirements while distracted. Labeling must happen immediately after the draw while the patient is still present. Practice writing the patient name and date of birth clearly while keeping track of your tube sequence. This prevents the most common preanalytical errors in the field.
Training and Clinical Competency
Most phlebotomy students choose between community college programs or vocational schools. Some programs now offer a hybrid format where you complete the didactic work online and attend in-person clinical sessions. When you choose a program, look for one that requires a high number of supervised venipunctures. Most experts recommend completing at least one hundred successful sticks before you start your first job. This volume of practice gives you the confidence to handle different vein types and patient temperaments. Ensure your program covers the latest standards for safety and infection control.
National Certification Paths
Earning a national certification makes you much more competitive in the job market. There are three major bodies to research. The American Society for Clinical Pathology offers the PBT credential. The National Healthcareer Association provides the CPT exam. The American Medical Technologists offers another PBT certification. These exams test your knowledge of additives, the order of draw, and practical venipuncture techniques. They also cover legal issues and patient privacy. You should check the current eligibility rules for each organization before you enroll. Some states like California, Nevada, and Washington have their own licensing requirements. You may need to provide proof of your clinical hours to the state board after you pass your national exam.
Job Search and Career Growth
Entry-level phlebotomists can find work in several settings. Hospital outpatient labs offer a fast-paced environment with a wide variety of tests. Local clinics or physician offices might provide a more consistent schedule. Blood centers are excellent for those who enjoy working with donors. Mobile phlebotomy is a growing field that often pays a higher hourly rate. During your interviews, you will likely be asked to recite the order of draw or explain which tube is used for a specific test. Mastering this knowledge shows the employer that you are reliable and detail-oriented. It proves you can protect the integrity of the samples and ensure patient safety from the very first day.
Final takeaways and next steps for certification and first jobs
The impact of preanalytical precision
Success in a medical laboratory depends on the quality of the specimen provided. As noted earlier, nearly 70 percent of all laboratory errors occur in the preanalytical phase. These mistakes happen before the blood ever reaches an analyzer. Choosing the wrong tube or failing to follow the correct order of draw leads to sample rejection and delayed patient care. Each rejected sample costs a facility significant time and money, but more importantly, it requires the patient to undergo another invasive procedure. Mastering the color codes and the chemical additives inside each vial is the primary defense against these errors. A phlebotomist who understands why a lavender tube cannot be drawn before a green tube protects the integrity of the results. This knowledge ensures that potassium levels are not falsely elevated and that coagulation times remain accurate.
Mastering the sequence and chemical interactions
The order of draw is a strict protocol established by the Clinical and Laboratory Standards Institute. It exists to prevent additive carryover. When the needle pierces the stopper of a tube, a tiny amount of the additive can coat the needle. If you move from a lavender tube containing EDTA to a green tube for electrolyte testing, the EDTA will contaminate the next sample. EDTA binds calcium and contains potassium. This contamination causes a phenomenon known as pseudohyperkalemia. The lab results will show dangerously high potassium levels that do not exist in the patient. Following the Evacuated Blood Collection Tube Guide ensures that additives like sodium citrate and heparin stay in their designated vials. The standard sequence begins with blood cultures to maintain sterility. It follows with light blue, red, gold, green, lavender, and finally gray. This progression is the industry standard for a reason.
Practical handling and inversion techniques
Drawing the blood is only half the task. Proper mixing is just as critical. Most tubes require immediate and gentle inversion to activate the additives. Shaking a tube causes hemolysis. This rupture of red blood cells releases hemoglobin into the serum or plasma. Hemolysis is responsible for 40 to 50 percent of all sample rejections. You must follow the manufacturer guidelines for each specific color. Light blue citrate tubes require three to four inversions. Red serum tubes and gold SST vials need five inversions. Green heparin and lavender EDTA tubes require eight to ten inversions. These actions ensure the blood mixes thoroughly with the anticoagulants or clot activators. Understanding the Understanding the Color Codes Used for Vacutainers in the United States helps you remember which chemicals are at work. For example, sodium citrate in the light blue tube works by binding calcium ions to prevent clotting. If the 1 to 9 ratio of additive to blood is not met due to an underfilled tube, the coagulation results will be invalid.
Mapping skills to certification requirements
National certification bodies like the ASCP, NHA, and AMT require a deep understanding of these concepts. The NHA CPT exam, for instance, consists of 120 questions. A significant portion of these questions focuses on safety and specimen collection. You will be tested on your ability to identify the correct tube for specific tests like a CBC or a PT/PTT. Most certification paths require a high school diploma and the completion of a training program. You must also demonstrate clinical competency by performing at least 30 to 100 successful venipunctures. These practical hours are where you apply your memorization of tube colors in a high-pressure environment. Employers look for candidates who can recite the order of draw without hesitation. This skill demonstrates that you are ready to handle the responsibilities of a clinical setting.
Immediate practice and verification steps
You should begin practicing your memorization daily. Use physical tubes if they are available to you. If not, use colored markers or flashcards to simulate the draw. Spend ten minutes every morning reciting the additives and the tests associated with each color. You must also verify the specific rules in your state. While many states do not require a license, others like California, Nevada, and Washington have strict mandates. Check the official websites of your state department of health to confirm these requirements. When choosing a training program, ensure it is accredited. A program should offer at least 40 hours of classroom instruction and a robust clinical rotation. Verify that the program provides enough hands-on experience to meet the eligibility criteria for the ASCP or NHA exams.
Transitioning to the workplace
Your first job in phlebotomy will likely be in a hospital lab, an outpatient clinic, or a blood donor center. Hospital roles often involve high-volume draws and diverse patient populations. Mobile phlebotomy is another growing field that offers higher pay but requires more independence. During your orientation, pay close attention to the facility-specific policies. While the CLSI provides the general framework, some labs have unique requirements for specialty tubes like royal blue for trace metals or tan for lead testing. Always consult the laboratory manual if you are unsure about a specific test. Professional organizations like the American Society for Clinical Laboratory Science provide resources for continuing education. Staying active in these communities helps you keep up with updates to the order of draw and new collection technologies.
Career focused advice for new professionals
Entering the medical field is a significant achievement. The transition from student to professional requires confidence and a commitment to accuracy. Do not rush your draws. Focus on the preanalytical steps that ensure patient safety. If you make a mistake in the order of draw, be honest and redraw the samples. Integrity is the most valued trait in a laboratory environment. As you prepare for your exams, remember that every detail matters. The color of a cap is not just a label. It is a guide to the chemistry that keeps patients safe. Your role is vital to the diagnostic process. With consistent practice and a focus on the standards, you will build a successful career in phlebotomy.
Sources
- Understanding the Color Codes Used for Vacutainers in the United … — Red: The red vacutainer tube contains no additives and is used for collecting serum samples. · Light Blue: The light blue vacutainer tube contains Sodium Citrate …
- Evacuated Blood Collection Tube Guide | McLendon Clinical … — All tubes sterile. Standard order of draw: BLOOD CULTURES, royal blue, red, light blue, SST (Gold), green, tan, yellow, pink, pearl, lavender.
- Decoding the Colour Codes of Evacuated Blood Collection Tubes — Every evacuated blood collection tube is covered with a colour-coded plastic or rubber cap. The colour helps indicate the type of additives in the tube.
- Tube Colors and the Tests They Are Used For | Phlebotomy USA — Royal blue top tubes are made for tests that look for tiny amounts of things in your blood. These tubes can have EDTA inside, or they can be …
- [PDF] The BD Vacutainer® Blood Collection System Order of Draw — The discard tube is used to remove air from the tubing of the collection set, to ensure the proper volume of blood is drawn into the tube.2 The discard tube …
- BD Vacutainer® blood collection tubes — BD Vacutainer ® Blood Collection Tubes support reliability, accuracy and integrity in the specimen pathway so clinicians get a quality specimen the first time.
- Blood Collection Tubes – Cleveland Clinic Laboratories — Used for aluminum level testing. Trace metal-free. This tube has a clot activator sprayed inside. Mix by inverting 5 times. Order Royal Blue (Red …
- Understanding the Significance of Vacutainer Tube Colors in US … — Light blue vacutainer tubes contain Sodium Citrate, an Anticoagulant that prevents the blood from clotting by binding calcium ions. These tubes are commonly …
- Different Vacutainer Types and Their Uses Explained — Vacutainer Types and their Uses ; Light Green, Plasma chemistry tests, ammonia levels, heparin monitoring. ; Yellow, Blood cultures (SPS), genetic …
Legal Disclaimers & Brand Notices
The information provided in this article is for informational and educational purposes only and does not constitute professional medical advice, diagnosis, or treatment. Always seek the advice of a physician or other qualified health provider with any questions you may have regarding a medical condition, laboratory procedure, or clinical protocol. Never disregard professional medical advice or delay in seeking it because of something you have read in this content.
All product names, logos, and brands mentioned in this text are the property of their respective owners. All company, product, and service names used in this article are for identification purposes only. Use of these names, logos, and brands does not imply endorsement or affiliation.